
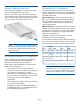
HP StoreEver MSL2024 Tape Library Getting Started (AK378-96060, December 2012)


9 Powering on the library
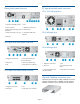
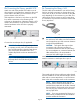
To use the web-based management interface, plug
one end of the Ethernet cable into the Ethernet port on
the back of the library. Plug the other end of the cable
into an Ethernet LAN port.
Plug the power cable into the library from an AC
power outlet.
Power on the library using the power button located
on the front panel. Check the LCD screen to make sure
the library is receiving power.
Power on the host server and all devices you powered
off earlier.
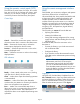
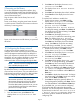
10 Configuring the library network
Configuring the network enables you to monitor,
configure, and control most library functions from the
remote management interface (RMI). By default, the
library will request an IP address from a DHCP server.
Optionally, you can configure the library to use a static
IP address. Once logged into the RMI, you can
administer further network changes through the RMI.
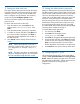
NOTE: Most IPv4 network configurations are
also available through the OCP.
The library supports IPv4 and IPv6 Internet Protocols.
By default, the library is configured to use IPv4, the
most common current version. You can enable IPv6 or
both Internet Protocols from the OCP or RMI, and then
continue configuring IPv6 settings from the RMI.
NOTE: The library is shipped without an
administrator password. You must set the
administrator password with the OCP before
you can use the RMI administrator functions.
Once the administrator password is set, you can
access the RMI by providing the administrator
password on the login screen.
To find the IPv4 IP address obtained via DHCP:
1. From the Home screen, press Next until the
display shows Status/Information. Press
Enter.
2. Press Next until the display shows Network
Information. Press Enter.
3. The display shows IPv4 Network Enabled.
Press Enter.
4. Press Next until the display shows the IP address.
5. Press Cancel until the display shows the home
screen.
To set the IPv4 IP address or enable IPv6:
1. From the Home screen, press Next until the
display shows Configuration. Press Enter.
2. Press Next until the display shows Configure
Network Settings. Press Enter.
3. The display shows IPv4 Network Enabled.
To change the setting, press Enter. Press Next until
the display shows the desired setting. Press Enter
to accept the new setting.
4. Press Next until the display shows IPv6
Networking. To enable IPv6 networking, press
Enter. The display shows IPv6 Network
Disabled. To change the setting, press Enter.
Press Next until the display shows the desired
setting. Press Enter to accept the new setting.
If IPv4 networking is enabled, you can continue
configuring the IPv4 network settings from the OCP:
1. From the Home screen, press Next until the
display shows Configuration. Press Enter.
2. Press Next until the display shows Configure
Network Settings. Press Enter.
3. Press Next until the display shows IPv4
Networking. Press Enter.
4. Press Next until the display shows DHCP (IPv4)
Enabled. To change the setting, press Enter.
Press Next until the screen displays the desired
setting. Press Enter to accept the new setting.
5. If DHCPv4 is disabled, press Next to display the
IP address. To change the IP address, press
Enter. Set the new IP address with the Next and
Enter keys.
6. Press Next to display the subnet mask. To change
the subnet mask, press Enter. Set the new subnet
mask with the Next and Enter keys.
7. Press Next to display the gateway address. To
change the gateway address, press Enter. Set the
new subnet address with the Next and Enter keys.
If you enabled IPv6, you must continue configuring
IPv6 from the RMI after setting the administrator
password. You can find the IPv6 IP address obtained
by the library from the OCP Information/Status
> Network Information menu item. See the user
and service guide for additional information on
configuring IPv6.
Page 9