
HP StorageWorks Multi-protocol Router Installation Guide (A7437-96003, September 2005)


Multi-protocol router installation guide 27
Setting up the MP Router as a stand-alone unit
Follow this procedure to set up the router as a stand-alone unit. The following items are required for
this setup.
• MP Router
• AC power cords and cables supplied with the router
• Rubber mounting feet supplied with the router
1. Place the MP Router on a flat, sturdy surface such as a table or lab bench.
2. Apply the rubber feet as follows:
a. Clean the four depressions located at each corner of the bottom of the router to ensure they
are free of dust.
b. Place a rubber foot in each depression, with the adhesive side against the chassis, and press
into place.
CAUTION: HP recommends installing the rubber feet on the router to help prevent the router from
accidentally sliding off the table or bench.
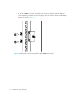
3. Connect the power cables to the MP Router power connectors and to a power outlet. Ensure the
power cable is routed so that it is not exposed to stress.
4. Turn on both MP Router power switches (position each AC switch to 1).
The router automatically runs a Power On Self-Test (POST).
CAUTION: Do not connect the router to the network until the IP address is correctly set. For
instructions on how to set the IP address, see ”Logging into the MP Router via a serial connection”
on page 41.