
HP StorageWorks Multi-protocol Router Installation Guide (A7437-96003, September 2005)


Multi-protocol router installation guide 37
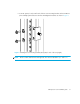
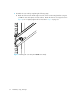
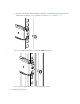
7. Tighten the nuts installed in step 4a on page 32.
NOTE: To uninstall a router, remove the middle #10-32 x 1/2-inch Phillips pan head screw with
captive star lock washer from either side of the rack uprights.
Connecting AC power
Follow these steps to power on the MP Router.
CAUTION: Do not plug the power cords into the power source until the MP Router is completely
installed in the rack.
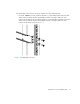
1. Connect the two MP Router power cords to the power inlets on the switch.
Verify that each power cord has a minimum service loop of 6 inches available at the connection
to the switch and is routed so that it is not exposed to stress.
2. Connect the remaining ends of the power cords to a power source with voltage of 100 to 240
VAC, 47 to 63 Hz.
NOTE: To protect against AC failure, connect the power cords to outlets on separate circuits if
possible.
3. Turn on each power switch (the 1 position indicates power on, the O position indicates power
off).
The MP Router automatically runs POST each time it is powered on. POST requires at least 3
minutes to complete.
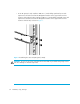
4. Verify that the power LED on the port side of the MP Router, shown in Figure 11, is green.
CAUTION: To prevent a potential IP address conflict, do not connect the MP Router to the network
until the IP address is correctly set. For instructions on setting the IP address, see ”Logging into the
MP Router via a serial connection” on page 41.