
HP StorageWorks Multi-protocol Router Installation Guide (A7437-96003, September 2005)


Replacing FRUs72
Time required
Less than 15 minutes.
Items required
• New fan assembly
• Phillips screwdriver (optional)
CAUTION: Disassembling any part of the fan assembly voids the part warranty and regulatory
certifications. There are no user-serviceable parts inside the fan assembly.
Since the cooling system relies on pressurized air, do not leave either of the fan assembly slots
empty longer than 15 minutes while the MP Router is operating. If a fan assembly fails, leave it in
the chassis until it can be replaced. Maintain both fan assemblies in operational condition to
provide proper unit cooling.
Each fan assembly uses two LEDs to indicate its status. See Table 16 on page 57 for a list of fan
assembly LEDs.
CAUTION: If you replace a fan assembly while the MP Router is operating, you must install it and
verify that it is operational within 15 minutes to maintain correct air pressure within the chassis.
Procedure
Follow these steps to remove and replace a fan assembly:
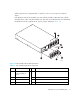
1. Remove the fan assembly from the chassis:
a. Unscrew the captive screw (see Figure 14 on page 71). If it is too tight, use a Phillips
screwdriver to loosen it.
b. Grasp the yellow handle on the fan assembly (see Figure 14).
c. Pull the fan assembly straight out of the chassis.
2. Install the new fan assembly:
a. Orient the new fan assembly with the yellow handle on the right (see Figure 14).
b. Gently push the fan assembly into the chassis until it is firmly seated.
CAUTION: Do not force the installation. If the fan assembly does not slide in easily, ensure that it is
correctly oriented before continuing with the installation.
c. Tighten the captive screw.
If the MP Router is powered on, the fan assembly begins operating as soon as it is correctly
seated.