
hp StorageWorks NAS e7000 v2 Maintenance and Service Guide


Removal and Replacement Procedures
58 NAS e7000 v2 Maintenance and Service Guide
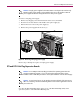
Figure 31: Removing a drive from a slimline drive bay
To replace a slimline drive, slide the drive into the slot until it engages the connector.
Note: For the diskette drive to be bootable, it must be installed in the top slimline drive bay. For the
DVD-ROM drive to be bootable, it must be installed in the bottom slimline drive bay.
Front Bezel
To remove the front bezel:
1. Power down the server. Refer to “Powering Down the Server” in this chapter.
2. Extend the server from the rack. Refer to “Extending the Rack from the Server” in this
chapter.
3. Remove the rear access panel. Refer to “Opening and Removing the Rear Access Panel”
in this chapter.
4. Remove the front access panel. Refer to “Removing the Front Access Panel” in this
chapter.
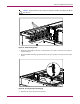
5. Remove the light pipe plastic assembly by pressing in the hooks at the panel and rear.
6. Using the T-15 Torx tool, remove the six screws on the exterior of the chassis (1) and the
two screws on the interior of the chassis next to the slimline drive bays (2).
1
2