
Compaq StorageWorks Getting Started RAID Array 3000 for Microsoft Windows Installation Guide (AA-RACZD-TE, January 2001)


7-4 Getting Started RAID Array 3000 for Microsoft Windows Installation Guide
Compaq Confidential – Need to Know Required
Writer: Bob Young Project: Getting Started RAID Array 3000 for Microsoft Windows Installation Guide Comments:
Part Number: AA-RACZD-TE File Name: h-ch7 Completing Your Storage Configuration Under Windows NT.doc Last Saved On: 11/28/00 9:51 AM
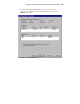
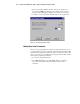
Understanding the Disk Administrator Display
Disk Administrator creates a Bar Chart display of your disk configuration.
Figure 7-2 shows that Windows NT has named the various devices that were
created using the StorageWorks RAID Array 3000 Command Console Client
GUI. Each disk device found by Windows NT is given a name for example,
(Disk 0, Disk 1, etc). There should be an entry shown for each virtual disk
created.
The entries in the Disk Administrator display should represent all your
StorageWorks RAID Array 3000 Storage Subsystem virtual disks. Figure 7-2
also shows the corresponding free space for each disk.
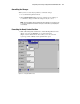
Verifying Your Configuration
1. Check that there is an entry in the Disk Administrator display for each
of your StorageWorks RAID Array 3000 Storage Subsystem virtual
disks. If there is not, you should go back and recheck your
configuration.
2. Check that the capacity shown matches the physical size of the physical
disk or the StorageWorks RAID Array 3000 Storage Subsystem virtual
disk. If it does not match, recheck the configuration for the
StorageWorks RAID Array 3000 Storage Subsystem and its members.
NOTE: Disk Administrator displays the usable capacity of a RAIDset and MIRRORset, not
the combined total of the physical members.