
HP StorageWorks Fabric OS 5.X Advanced Web Tools Administrator Guide (AA-RVHYB-TE, September 2005)


118 Administering FICON CUP fabrics
Displaying the CUP port connectivity configurations list
1. Click a FICON-enabled switch from the Fabric Tree.
2. Launch the Switch Admin module as described on page 36.
3. Click the FICON CUP tab.
The FICON CUP tabbed page is displayed, with the FMS subtabbed page in front (see Figure 42 on
page 114). All attributes on this page are read-only until FMS mode is enabled.
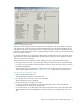
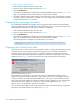
4. Click the CUP Port Connectivity subtab (see Figure 44).
Figure 44 Configuring CUP port connectivity
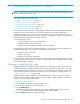
Creating or editing CUP port connectivity configurations
Use the following procedure to create a new CUP port connectivity configuration or to edit an existing
configuration.
1. Display the CUP port connectivity configuration list, as described on page 117.
2. Create a new configuration or edit an existing configuration:
• To create a new configuration, click New.
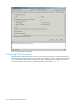
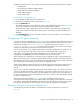
The Create Port CUP Connectivity Configuration dialog box displays all ports and port names on
the selected switch (similar to the dialog box shown in Figure 45. The Block column, Prohibit
column, and prohibited ports matrix are displayed as empty, for you to configure.
• To edit an existing configuration, click the configuration and then click Edit.
The Edit Port CUP Connectivity Configuration dialog box displays the content of the selected
configuration from the switch in a table format (see Figure 45).
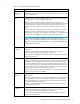
3. Optional: Select the check box corresponding to a port you want to block on the Block column. Repeat
this step for all ports you want to block. Select the Block All check box to block all ports.
4. Optional: Select the check box corresponding to a port you want to prohibit on the Prohibit column.
Repeat this step for all ports you want to prohibit. Select the Prohibit All checkbox to prohibit all ports.
The cells in the matrix are updated with X icons to identify prohibited ports.