
HP StorageWorks 6000-series Virtual Library System User Guide (AH809-96049, September 2010)
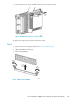


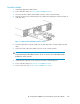


3. When the disk is no longer spinning, remove the drive from the disk array.
Figure 108 Removing a disk array hard drive
.
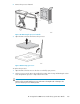
To replace the component:
1. Pull out the latch handle on the drive out as far as it can go.
2. Slide the replacement drive into the bay until it can go no further. About 1 cm (0.5 inch) of the
drive protrudes from the bay.
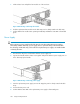
3. Push the release lever all the way in. This action installs the drive completely in the bay and seats
it firmly against the connector in the disk array.
4. Firmly close the latch handle to lock the drive in the drive bay.
5. Observe the drive status LEDs to confirm that the replacement drive is functioning correctly. See
Front Panel LEDs.
Fan Module
CAUTION:
Before removing a fan module from the disk array, be sure that a replacement fan module is
immediately available. Removing a fan module causes a significant change in the airflow within the
disk array, and the disk array could overheat if a replacement fan module is not installed within a
relatively short time.
HP StorageWorks 6000–series Virtual Library System User Guide 295