
HP StorageWorks 6000-series Virtual Library System User Guide (AH809-96049, September 2010)
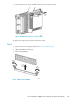


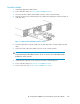


1. Lift the release lever and pull the fan module out of the enclosure.
Figure 109 Removing a disk array fan module
.
2. Slide the replacement fan module into the disk array until it is firmly seated in the disk array.
3. Confirm that the fan module starts operating immediately and that the status LED is illuminated
green.
Power Supply
CAUTION:
Before removing a power supply from the disk array, be sure that a replacement power supply is
immediately available. Removing a power supply causes a significant change in the airflow within
the disk array, and the disk array could overheat if a replacement power supply is not installed within
a relatively short time.
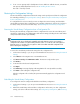
1. Disconnect the AC power cord from the defective power supply unit.
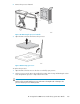
2. Squeeze the handle and the release lever together and pull the defective power supply unit out
of the disk array by the handle.
Figure 110 Removing a disk array power supply
.
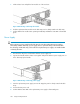
3. Insert the replacement power supply unit into the empty bay until it is firmly seated in the disk
array.
4. Connect the AC power cord.
5. Confirm that the status LED on the replacement power supply is illuminated green.
Component Replacement296