
HP StorageWorks 6000-series Virtual Library System User Guide (AH809-96049, September 2010)


To upgrade to higher capacity disks:
1. Backup the current VLS virtual cartridges to tape. Use the tape copy feature from the backup
application.
2. Ensure the MSA firmware is at 2.02 or later and the VLS software version is at 2.0.0 or later,
which are the required minimum versions to support the higher capacity disks. If necessary,
download and install the correct software and firmware before continuing.
3. Purchase the required number of individual SATA drives from HP. All 12 drives in an array must
be of the same type. Do not mix drive types within an array.
4. To upgrade to 750 GB disks, purchase and install one additional capacity license per 750 GB
disk. (750 GB disks require two licenses each, as opposed to 250 and 500 GB disks which re-
quire only one license each.)
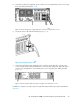
5. Power off the node. See “Powering Off the System” on page 130.
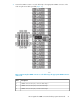
6. Remove all disks from each array that is to be upgraded and replace them with higher capacity
disks.
7. Power on the node. See “Powering on the VLS6000–series System” on page 125.
8. Run a “Rebuild Storage Pools” operation from Command View VLS. See Rebuilding the Storage
Pool. This deletes the current RAID configuration and recreates it.
9. Recreate previous virtual cartridges using Command View VLS. See “Creating Cart-
ridges” on page 164.
10. Restore previous virtual cartridge data from the backup tapes to the virtual cartridges. Use the
tape copy feature from the backup application.
Removing Arrays
Removing an array from the system destroys all current virtual tapes in the system. Once a disk array
is added to the VLS, the only way it can be removed from the VLS storage pool is by powering off
the node, removing the array, powering on the node, then running Rebuild Storage Pool (see Rebuilding
the Storage Pool). This will delete the array from the configuration and reformat the remaining arrays
into working capacity.
In addition, if you add a used array to another system you must perform the steps listed in this section
then run Rebuild Storage Pool in order to add the capacity to your system. This destroys all current
virtual tapes in the system while it reformats all the arrays to reflect the new working capacity.
Managing Storage Pools
The VLS6000–series virtual tape library automatically creates one pool across all arrays on the library.
On the system page, select Storage Pools to view the pool information. When necessary, you can
also rebuild the pool from this screen.
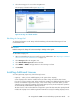
Viewing the Storage Pool
To view the storage pool information:
1. Open a Command View VLS session and log in as the administrator. See “Opening a Command
View VLS Session from a Web Browser” on page 135.
2. Select Storage Pools in the navigation tree.
Storage Configuration68