
HP StorageWorks X1000 Automated Storage Manager user guide (572087-001, June 2009)
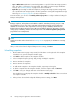

1. In the name dialog box, type a name for your virtual library.
2. In the Number of slots field, type or use the arrows to indicate how many slots are needed for
your virtual library.
3. When you are done, click Next to open the Storage Allocation page (see
“Allocating space for components” on page 22).
NOTE:
The number of slots needed for your virtual library will depend on the media rotation type
chosen for the backups that will use the virtual library. The number of slots must be high
enough to support the rotation type you intend to use for scheduling backups to this virtual
library. See
Planning for Media Rotation
in the
Data Protector Express User's Guide and
Technical Reference
for more information.
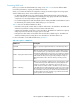
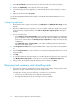
Allocating space for components
Use the Storage Allocation page in the wizards to specify the allocated space size and advanced
configuration settings for each application component or shared folder listed. Default values are
provided.
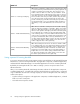
1. Do one of the following:
• Click Next to accept the default values that ASM has provided for the components, user-
defined application, or shared folder selected.
• Change the default size values:
• Select a row to edit.
• Highlight the storage size unit value and then enter a new value as necessary: megabytes
(MB), gigabytes (GB), or terabytes (TB).
• Highlight the storage size number value and enter a new value, or click the arrow buttons
to change the value.
NOTE:
The Size Range column shows the minimum and maximum storage space that can be
allocated to each application component, user-defined application, or shared folder listed.
Whenever you change the allocated space size or an advanced configuration setting for
an application component, the maximum value for Size Range is recalculated for all the
application components listed.
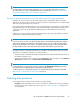
NOTE:
To change the advanced configuration settings for an application component, user-defined
application, or shared folder listed, select the item to edit and then click Advanced. See
“Setting advanced storage properties” on page 23 for more information.
2. When you are done selecting the storage allocation and configuration settings, click Next to
open the summary page.
Hosting storage for applications and shared folders22