
HP StorageWorks External Storage XP user guide for the XP12000, XP10000, SVS200 (T1706-96009, October 2007)

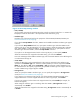
MapsallexternalLUslistedintheCU:LDEV list at one time. When you click Linear and then select
an internal LDEV on the LDEV map, External Storage XP automatically selects from the LDEV map
the same number of internal LDEVs as external LUs listed in the CU:LDEV list, starting at the internal
LDEV you selected. The LDEV numbers of the selected internal LDEVs are sequential. When Interval
isset,mappingisdoneatthespecified number of intervals. To map one external LU to another
internal LDEV after mapping the external LU automatically using the Linear button, release the Linear
button, and map the external LU individually.
• CU:LDEV list
Displays the XP12000/XP10000/SVS200 CU:LDEV numbers of external LUs mapped as internal
LDEVs. (N/A) (Not Assigned) means the external LUs are not yet mapped as internal LDEVs. To map
an external LU as an internal LDEV, select an external LU with (N/A) in the CU:LDEV list. To map all
external LUs in the CU:LDEV list at one time, use the Linear button.
• Interval
If you select two or more volumes in the CU:LDEV list or click Linear for mapping, you can select the
interval that arranges each volume. Values can be from 0 to 255.Defaultis0.
For example, if you select three volumes in the CU:LEDV list, set Interval to 255, and map the first
volume to CU:LDEV number 00:01, the second and third volumes are mapped to 01: 01 and 02:01,
respectively.
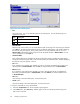
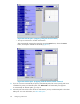
• LDEV map
Each cell in the map represents an internal LDEV. Select a cell for the internal LDEV on the map. The
selected cell turns blue, and the selected LDEV is mapped to the external LU. internal LDEVs that have
been mapped appear in gray, and those not yet mapped appear in white.
• Previous and Next buttons
If you select multiple external LUs in the Device list, click Previous to map the external LU in the
row just above the currently selected external LU. Click Next to map the external LU in the row just
below the currently selected external LU.
• OK button
Displays the SSID window, where you can continue with the next step of the mapping operation. If the
SSID setting is not necessary, the Add LU window closes, and the LU Operation pane appears.
The OK button is available when mapping on the Add LU window is complete.
• Cancel button
Cancels all mapping operations, closes the Add LU window, and returns to the LU Operation pane.
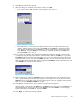
Select Paths pane
All paths that can be set as primary and alternate paths appear in the Select Paths pane. To set a specific
path as the alternate path, use the Select Paths pane to specify candidates for the alternate paths.
If you l
et alternate paths be automatically set with all connected normal paths as candidates, you can
omit the setting operation on the Select Paths pane.
External Storage XP user guide
83