HP StorageWorks XP Disk Array Configuration Guide for HP-UX XP24000, XP12000, XP10000, SVS200 Part number: A5951-96018 Ninth edition: June 2007
Legal and notice information © Copyright 2003, 2007 Hewlett-Packard Development Company, L.P. Confidential computer software. Valid license from HP required for possession, use or copying. Consistent with FAR 12.211 and 12.212, Commercial Computer Software, Computer Software Documentation, and Technical Data for Commercial Items are licensed to the U.S. Government under vendor's standard commercial license. The information contained herein is subject to change without notice.
Contents About this guide ................................................................................... 7 Intended audience ...................................................................................................................... Related documentation ................................................................................................................ Document conventions and symbols ...............................................................................................
2 Troubleshooting ............................................................................... 33 Error conditions ........................................................................................................................ Calling the HP support center ..................................................................................................... Contact information ............................................................................................................
Figures 1..SNMP configuration ............................................................................................... 13 2..Point-to-point fabric topology example ....................................................................... 16 3..Multi-cluster environment ..........................................................................................
Tables 1..Document conventions ............................................................................................... 7 2..Host group modes (options) ..................................................................................... 15 3..Fabric topology settings ........................................................................................... 16 4..SAN fabric zoning and LUN security settings ............................................................. 18 5..Device file name example .
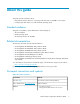
About this guide This guide provides information about: • Requirements and procedures for connecting an XP disk array or SVS200 to a host system • Configuring the disk array for use with the HP-UX operating system Intended audience This guide is intended for system administrators with knowledge of: • The host hardware • HP-UX operating system • XP disk arrays and/or the SVS200 Related documentation The following documents provide related information: • • • • • • • HP StorageWorks HP StorageWorks HP Stora
Convention Element • GUI elements that are clicked or selected, such as menu and list items, buttons, tabs, and check boxes Italic text Text emphasis Monospace text • File and directory names • System output • Code • Commands, their arguments, and argument values Monospace, italic text • Code variables • Command variables Monospace, bold text Emphasized monospace text CAUTION: Indicates that failure to follow directions could result in damage to equipment or data.
• 1 KB (kilobyte) = 1,024 bytes • 1 MB (megabyte) = 1,0242 bytes • 1 GB (gigabyte) = 1,0243 bytes • 1 TB (terabyte) = 1,0244 bytes • 1 block = 512 bytes Window illustrations The windows shown in this guide were displayed on a Windows computer with the Internet Explorer browser. The windows may appear different on your computer depending on the operating system and browser being used. Window contents also vary depending on installed program products and the storage system being managed.
To make comments and suggestions about product documentation, please send a message to storagedocsFeedback@hp.com. All submissions become the property of HP.
1 Installing and configuring HP-UX for the XP disk array You and your HP service representative each play a role in installation. Your HP service representative is responsible for installing the disk array and formatting the disk devices. You are responsible for configuring the host server for the new devices with assistance from your HP service representative. Features and requirements Ask your HP service representative about the latest supported hardware and software.
Device emulation types The XP family of disk arrays and the SVS200 support these device emulation types: • OPEN-K/3/8/9/E devices: OPEN-x logical units represent disk devices. Except for OPEN-V, these devices are based on fixed sizes. OPEN-V is a user-defined size. Supported emulations include OPEN-3, OPEN-8, OPEN-9, OPEN-E, OPEN-L, and OPEN-V devices.
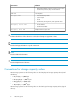
Figure 1 SNMP configuration XP RAID Manager command devices HP StorageWorks XP RAID Manager manages HP StorageWorks XP Business Copy Software or HP StorageWorks XP Continuous Access Software operations from a host server. To use XP RAID Manager, you must designate at least one LDEV as a command device. This can be done with XP Remote Web Console, XP Command View (XP arrays only), or Command View XP Advanced Edition Software.
• Setting and verifying the auto-mount parameters Installing and configuring the disk array The HP service representative performs these tasks: • Assembling hardware and installing software • Loading the microcode updates • Installing and formatting devices After these tasks are finished, you will use XP Remote Web Console, XP Command View (XP arrays only), Command View XP Advanced Edition Software, or XP Array Manager to complete the remaining tasks listed below.
The following host group modes (options) are available for HP-UX: Table 2 Host group modes (options) Host Group Mode Function Default Comments 12 Deletion of Ghost LUN Inactive Previously MODE280 33 Task retry ID enable Inactive (HP-UX 11.31 only CAUTION: Changing host group modes for ports where servers are already installed and configured is disruptive and requires the server to be rebooted.
Fibre Address In fabric environments, the port addresses are assigned automatically. In arbitrated loop environments, set the port addresses by selecting a unique arbitrated loop physical address (AL-PA) or loop ID for each port. For specific values, refer to the HP StorageWorks XP LUN Manager User's Guide applicable to your array. Fabric and Connection parameter settings Set each array port to FABRIC ON or OFF with connections of POINT-TO-POINT or FC-AL as shown in the following table and figures.
Fabric parameter Connection parameter Provides ON FC-AL NL-port (private arbitrated loop) OFF Direct Fabric Attach Not supported Installing and configuring the host This section explains how to install and configure the host and host bus adapters (HBAs) that connect the host to the disk array. Loading the operating system and software Follow the manufacturer's instructions to load the operating system and software onto the host.
Fabric zoning and LUN security for multiple operating systems You can connect multiple clusters of various operating systems to the same switch and fabric using appropriate zoning and LUN security as follows: • Storage port zones may overlap if more than one operating system needs to share an array port. • Heterogeneous operating systems may share an XP array port if you use Secure Manager and set the appropriate host group and mode. All others must connect to a dedicated XP array port.
In Command View XP Advanced Edition Software, LUN mapping includes: • Configuring ports • Creating storage groups • Mapping volumes and WWN/host access permissions to the storage groups For details see the HP StorageWorks XP LUN Manager User’s Guide or the HP StorageWorks Command View XP Advanced Edition Software Device Manager Web Client User’s Guide. Note the LUNs and their ports, WWNs, nicknames, and LDEVs for later use in verifying host and device configuration.
To verify device recognition: 1. Log in to the system as root. 2. Display the device data to verify that the system recognizes the newly installed devices on the disk array. Use the ioscan –fn command to display the device data. On a system with a large LUN configuration, HP-UX may not build device files on all LUNs. Enter insf –e to build all missing device files. Example # ioscan -fn Class I H/W Path bc 6 14 fc 1 14/12 lan 2 14/12.5 fcp 1 14/12.8 ext_bus 6 14/12.8.0.0.0 disk 4 14/12.8.0.0.0.0.
5. SCSI bus instance number Hardware path SCSI TID LUN File name 00 14/12.6.1 6 2 c6t0d1 Verify that the SCSI TIDs correspond to the assigned port address for all connected ports (see mapping tables in Appendix B - Disk array device emulations, for values). If so, the logical devices are recognized properly. If the logical devices are not recognized properly: • Check the AL-PA for each port using the LUN Manager software.
However, some HP-compatible systems do not create the device files automatically. If verification shows that the device files were not created, follow the instructions in Creating the device files. The following procedure verifies both types of device files: 1. Display the block-type device files in the /dev/dsk directory using the ls –l command with the output piped to more. Verify there is one block-type device file for each disk array device.
Creating the device files If the device files were not created automatically when the system was restarted, use the insf –e command in the /dev directory to create the device files. After this command is executed, repeat the procedures in the previous section Verifying device recognition to verify new device recognition and the device files and driver. Example # insf -e insf: Installing special files for mux2 instance 0 address 8/0/0 : : : : : : : : # Failure of the insf –e command indicates a SAN problem.
# cd /dev/dsk Go to /dev/dsk directory. # mknod /dev/dsk/c2t6d0 b 31 0x026000 File name, b=block-type, 31=major #, 0x026000= minor # Create block-type file. # cd /dev/rdsk Go to /dev/rdsk directory. # mknod /dev/rdsk/c2t6d0 c 188 0x026000 Create character-type file. File name, c=character-type, 177=major #, 0x026000=minor # : # The character-type device file is required for volumes used as raw devices (for example, 3390-3A/B/C).
Creating new volume groups You must create new volume groups for the new physical volumes. If desired, you can also add any of the volumes on the disk array to existing volume groups using the vgextend command. The physical volumes that make up one volume group can be located either in the same disk array or in other disk arrays. To allow more volume groups to be created, use SAM to modify the HP-UX system kernel configuration.
Volume group configuration for /dev/vg06 has been saved in /etc/1vmconf/vg06.conf. For Logical Unit Size Expansion (LUSE) volumes that contain more than 17 OPEN-8/9 LDEVs or more than 7043 MB (OPEN-8/9*n-CVS), use the –s and –e physical extent (PE) parameters of the vgcreate command. See “LUSE device parameters” on page 42. If you need to delete a volume group, use the vgremove command (for example, vgremove /dev/vgnn).
Example lvextend –L size /dev/vgnn/lvolx lvreduce Decreases the size of an existing logical volume. Any file system attached to the logical volume must be unmounted before executing the lvreduce command. Example lvreduce –L size /dev/vgnn/lvolx CAUTION: Data within the file system can be lost after execution of lvreduce. Create logical volumes after you create volume groups. A logical volume must be created for each new SCSI disk device To create logical volumes: 1.
character device "/dev/vg06/rlvol1". Logical volume "/dev/vg06/lvol1" has been successfully extended. Volume Group configuration for /dev/vg06 has been saved in /etc/1vmconf/vg06.conf. 3. Use the lvdisplay command to verify that the logical volume was created correctly.
# newfs /dev/vg06/rlvol1 create file system newfs: / etc/default/fs determine the file system type mkfs (hfs): ... : 7188496, 7198520, 7208544 # Example 3 # newfs -F vxfs /dev/vg06/rlvol1 : # newfs -F hfs /dev/vg06/rlvol2 2. Specify file system type Repeat step 1 for each logical volume on the disk array. Setting the I/O timeout parameter Set the I/O timeout value for each disk device to 30 seconds. 1.
PV Name VG Name PV Status : Stale PE IO Timeout (Seconds) 4. /dev/dsk/c0t6d0 /dev/vg06 available 0 30 [New I/O timeout value] Repeat the above steps for each new disk connected to the system. Creating the mount directories Create a mount directory for each logical volume. Choose a unique name for each mount directory that identifies the logical volume. To create a mount directory for each logical volume: 1. Use mkdir with the new mount directory name as the argument to create the mount directory.
: /ldev/vg06/lvol1 4. 2348177 9 2113350 0% /AHPMD-LU00 As a final verification, perform some basic UNIX operations (for example file creation, copying, and deletion) on each logical device to make sure that the devices on the disk array are fully operational. Example #cd /AHPMD-LU00 #cp /bin/vi /AHPMD-LU00/vi.back1 #ls -l drwxr-xr-t 2 root root 8192 Mar 15 11:35 lost+found -rwxr-xr-x 1 root sys 217088 Mar 15 11:41 vi.back1 #cp vi.back1 vi.
Parameter Name Enter P5 Enhance 0 P6 File system check (fsck pass) Order for performing file system checks P7 Comments Comment statement 2. Reboot the system. 3. Use the bdf command to verify the file system again.
2 Troubleshooting This section includes resolutions for various error conditions you may encounter. If you are unable to resolve an error condition, ask your HP support representative for assistance. See Calling the HP support center. Error conditions Depending on your system configuration, you may be able to view error messages (R-SIMs) as follows: • In XP Remote Web Console (Status tab). • In Command View Advanced Edition (“Alerts” panel).
Error condition Recommended action • The control file exists. • The correct major number (64) and minor number are used with mknod. • The block-type device file exists and is entered correctly with vgcreate. • The physical volume is not already allocated to another volume group. Logical volumes cannot be created (lvcreate). Verify the following: • The volume capacity for OPEN-x volumes is not greater than the maximum capacity allowed. See Appendix B - Disk array device emulations.
• • • • • • Technical support registration number (if applicable) Product serial numbers Product model names and numbers Applicable error messages Operating system type and revision level Detailed, specific questions For continuous quality improvement, calls may be recorded or monitored.
Troubleshooting
A Path worksheet Worksheet Table 9 Worksheet LDEV (CU:LDEV) (CU = control unit) 0:00 0:01 0:02 0:03 0:04 0:05 0:06 0:07 0:08 0:09 0:10 Device Type SCSI Bus Number Path 1 Alternate Paths TID: TID: TID: LUN: LUN: LUN: TID: TID: TID: LUN: LUN: LUN: TID: TID: TID: LUN: LUN: LUN: TID: TID: TID: LUN: LUN: LUN: TID: TID: TID: LUN: LUN: LUN: TID: TID: TID: LUN: LUN: LUN: TID: TID: TID: LUN: LUN: LUN: TID: TID: TID: LUN: LUN: LUN: TID: TID: TID: LUN:
Path worksheet
B Disk array supported emulations This appendix provides information about supported emulations and device type specifications. Some parameters may not be relevant to your array. Consult your HP representative for information about supported configurations for your system.
Emulation(Note 1) Category (Note 2) Blocks (512 bytes ) OPEN-8 SCSI disk 14351040 512 9966 OPEN-9 SCSI disk 14423040 512 OPEN-E SCSI disk 28452960 OPEN-L SCSI disk OPEN-V Sector Size (bytes) # of Cylinders Heads Sectors per track Capacity MB*(Note 3) 15 96 7007 10016 15 96 7042 512 19759 15 96 13893 71192160 512 49439 15 96 34761 SCSI disk max=125827200 512 Note 5 15 128 Note 6 OPEN-3*n SCSI disk 4806720*n 512 3338*n 15 96 2347*n OPEN-8*n SCSI disk 1
Note 3: The device capacity can sometimes be changed by the BIOS or host adapter board. This may make actual capacity different from that listed in the table.
Example For an OPEN-V CVS LUSE volume with capacity = 49 MB and n = 4: # of cylinders = 49 × 16/15 × 4 = 52.26 × 4 = 53 × 4 = 212 Note 6: The capacity of an OPEN-3/8/9/E CVS volume is specified in MB, not number of cylinders. The capacity of an OPEN-V CVS volume can be specified in MB or number of cylinders. You set the volume size using the XP Remote Web Console, XP Command View (XP arrays only), or Command View XP Advanced Edition Software.
Device type OPEN-E*n Physical extent size (PE) Max physical extent size (MPE) n = 35 8 30810 n = 36 8 31691 n = 2 to 9 default default n = 10 8 17366 n = 11 8 19102 n = 12 8 20839 n = 13 8 22576 n = 14 8 24312 n = 15 8 26049 n = 16 8 27786 n = 17 8 29522 n = 18 8 31259 n = 19 8 32995 n = 20 8 34732 n = 21 8 36469 n = 22 8 38205 n = 23 8 39942 n = 24 8 41679 n = 25 8 43415 n = 26 8 45152 n = 27 8 46889 n = 28 8 48625 n = 29 8 50362 n =
Device type Physical extent size (PE) Max physical extent size (MPE) n = 36 8 62518 n = 2 to 3 default default OPEN-8/9/E-CVS OPEN-V default default OPEN-8/9/E*n-CVS OPEN-V*n (n = 2 to 36) 70 to 119731(MB) × N1 8 default 119732 to (MB) × N1 8 N2 OPEN-L*n N1 = [ VCS volume capacity (in MB) from Remote Console PC ] × nN2 = N1 / PE ( means round up to next integer) Example: CVS volume capacity is 6000 MB for OPEN-9*22-CVS volume:N1 = 6000 × 22 = 132000N2 = 132000/8 = 16500 SCSI TID map for
t value AL-PA AL-PA AL-PA AL-PA AL-PA AL-PA AL-PA AL-PA 2 E4 CB AE 90 6E 53 36 1F 3 E2 CA AD 8F 6D 52 35 1E 4 E1 C9 AC 88 6C 51 34 1D 5 E0 C7 AB 84 6B 4E 33 1B 6 DC C6 AA 82 6A 4D 32 18 7 DA C5 A9 81 69 4C 31 17 8 D9 C3 A7 80 67 4B 2E 10 9 D6 BC A6 7C 66 4A 2D 0F 10 D5 BA A5 7A 65 49 2C 08 11 D4 B9 A3 79 63 47 2B 04 12 D3 B6 9F 76 5C 46 2A 02 13 D2 B5 9E 75 5A 45 29 01 14 D1 B4 9D 74 59
Disk array supported emulations
C Reference information for the HP System Administration Manager (SAM) The HP System Administration Manager (SAM) is used to perform HP-UX system administration functions, including: • • • • Setting up users and groups Configuring the disks and file systems Performing auditing and security activities Editing the system kernel configuration This appendix provides instructions for: • Using SAM to configure the disk devices • Using SAM to set the maximum number of volume groups Configuring the devices using
2. Verify that the new disk array devices are displayed in the Disk Devices window. 3. Select the device to configure, select the Actions menu, select Add, and then select Using the Logical Volume Manager. 4. In the Add a Disk Using LVM window, select Create... or Extend a Volume Group. 5. In the Create a Volume Group window, enter the name of the new or existing volume group to assign the new device to, and then click OK twice. The Add a Disk Using LVM window now displays the volume group name. 6.
5. When the configuration window opens, click Yes to create the new kernel (or click No to return to the Configurable Parameters window.) 6. When the Reboot the System window opens, click OK to move the new kernel into place and reboot the system.
Reference information for the HP System Administration Manager (SAM)
Glossary AL Arbitrated loop. AL-PA Arbitrated loop physical address. array group A group of 4 or 8 physical hard disk drives (HDDs) installed in an XP disk array and assigned a common RAID level. RAID1 array groups consist of 4 (2D+2D) or 8 HDDs (4D+4D). RAID5 array groups include a parity disk but also consist of 4 (3D+1P) or 8 HDDs (7D+1P). All RAID6 array groups are made up of 8 HDDs (6D+2P).
host mode Each port can be configured for a particular host type. These modes are represented as two-digit hexadecimal numbers. For example, host mode 08 represents an HP-UX host. LDEV Logical device. An LDEV is created when a RAID group is carved into pieces according to the selected host emulation mode (that is, OPEN-3, OPEN-8, OPEN-L). The number of resulting LDEVs depends on the selected emulation mode. The term LDEV is often used synonymously with the term volume. LUN Logical unit number.
component separated by a colon. For example 00:00 and 01:00 are two uniquely identified volumes; one is identified as CU = 00 and LDEV = 00, and the other as CU = 01 and LDEV = 00; they are two unique separate virtual storage devices within the XP array. VSC Volume size customization. Synonymous with CVS. WWN World Wide Name. A unique identifier assigned to a Fibre Channel device. XP Command View HP StorageWorks XP Command View, a software product for managing XP arrays.
Glossary
Index A AL-PA, 16 arbitrated-loop physical address, 16 audience, 7 auto-mount parameters, setting, 31 C clustering, 17 command device(s) designate at least one LDEV as a, 13 RAID Manager, 13 configuration device, 21 emulation types, 12 recognition, 19 using SAM, 47 Fibre Channel ports, 15 HBAs, 17 host, 17 Host Mode, setting, 14 I/O timeout parameter, 29 mount directories, creating, 30 port, 15 System Option Mode, 15 conventions document, 7 storage capacity values, 8 D device(s) configuration, 21 using SA
G O glossary, 51 operating system(s) loading, 17 LUN security for, 18 multiple, fabric zoning for, 18 supported versions of HP-UX, 11 H HBA(s) configuring, 17 installation, verifying, 19 help obtaining, 9 host configuration, 17 doesn't reboot properly after hard shutdown, 33 hangs up, 34 logical devices not recognized, 33 parity error, 34 host bus adapters, see "HBAs", 11 Host Mode, setting, 14 HP service representative tasks, 14 technical support, 9, 34 HP-UX, supported versions, 11 I I/O timeout para
U UNIX, supported versions HP-UX, 11 V volume(s) groups cannot be created, 33 creating, 25 setting maximum number, 48 logical auto-mount parameters, 31 cannot be created, 34 creating, 26 file systems, 28, 30 physical cannot be created, 33 creating, 24 creating groups, 25 W websites HP , 9 HP Subscriber's Choice for Business, 9 product manuals, 7 worksheet, path, 37 X XP Array Manager, 11, 13, 14 XP arrays storage capacity, 11 XP Business Copy Software, 13 XP Command View, 11, 13, 14, 15 XP Continuous Acc