
6.1 HP IBRIX X9000 Network Storage System Installation Guide (TA768-96058, June 2012)


More informationTaskStep
“Starting the installation and configuration”
(page 8)
Perform the installation5.
“Configuring virtual interfaces for client access”
(page 80)
Set up IBRIX virtual IP addresses for client access6.
“Post-installation tasks” (page 77)Perform post-installation tasks:7.
• Update license keys if not done already
• Configure server standby pairs for High Availability
• Configure the Ibrix Collect feature
• Configure HP Insight Remote Support
• Create file systems if not already configured
Optionally, also configure the following features:
• NFS, CIFS, HTTP/HTTPS, FTP/FTPS shares
• Remote replication
• Data retention and validation
• Antivirus support
• Software snapshots
• Block snapshots
• Data tiering
• NDMP Backup Protocol Support
“Adding Linux and Windows X9000 clients”
(page 83)
Configure X9000 clients for Linux or Windows (optional)8.
Installing the latest IBRIX X9000 software release
Obtain the latest 6.1 release from the IBRIX X9000 software dropbox. Download the Quick Restore
ISO image and then use either a DVD or a USB key to install the image.
Use a DVD
1. Burn the ISO image to a DVD.
2. Insert the Quick Restore DVD into the server's DVD-ROM drive.
3. Restart the server to boot from the DVD-ROM.
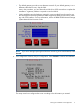
4. When the HP Network Storage System screen appears, enter qr to install the software.
Repeat steps 2–4 on each server.
Use a USB key
1. Copy the ISO to a Linux system.
2. Insert a USB key into the Linux system.
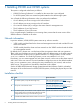
3. Execute cat /proc/partitions to find the USB device partition, which is displayed as
dev/sdX. For example:
cat /proc/partitions
major minor #blocks name
8 128 15633408 sdi
4. Execute the following dd command to make USB the QR installer:
dd if=<ISO file name with path> of=/dev/sdi oflag=direct bs=1M
For example:
dd if=X9000-QRDVD-6.2.96-1.x86_64.iso of=/dev/sdi oflag=direct bs=1M
4491+0 records in
Installing the latest IBRIX X9000 software release 7