
6.0 HP X9000 File Serving Software File System User Guide (TA768-96043, October 2011)

Adding an HTTP share
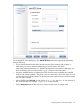
To add an HTTP share, click Add Share on the Shares bottom panel. The HTTP Wizard opens at
the Create Share dialog box.
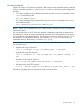
To add an HTTP share from the command line, use the following command:
ibrix_httpshare -a SHARENAME -c PROFILENAME -t VHOSTNAME -f FSNAME -p
dirpath -P urlpath [-u USERLIST] [-S SETTINGLIST]
For the -S option, use a comma to separate the settings, and enclose the settings in quotation
marks, such as “davmethods=true,browseable=true,readonly=true”.
For example, to create a new HTTP share and enable the WebDAV property on that share:
# ibrix_httpshare –a share3 –-c cprofile1 –t dav1vhost1 –f ifs1 –p
/ifs1/dir1 –P url3 –S “davmethods=true”
To modify an existing HTTP share and enable WebDAV on that share:
# ibrix_httpshare –-m share1 –c cprofile1 –t dav1vhost1 –S
"davmethods=true"
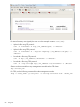
To see all of the valid settings for an HTTP share, use the following command:
ibrix_httpshare –L
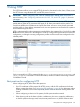
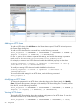
Modifying an HTTP share
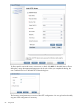
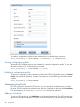
To change the properties for an HTTP share, select the share on the Shares panel, click Modify
Share, and make the necessary changes on the Modify HTTP Share dialog box. To modify a share
from the CLI, use the following command:
ibrix_httpshare -m SHARENAME -c PROFILENAME -t VHOSTNAME [-f FSNAME -p
dirpath] [-P urlpath] [-u USERLIST] [-S SETTINGLIST]
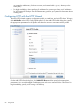
Viewing HTTP shares
The Modify HTTP Share dialog shows the complete configuration of an HTTP share. To view this
information from the CLI, use the following command:
ibrix_httpshare -i SHARENAME -c PROFILENAME -t VHOSTNAME [-v level]
90 Using HTTP