
HP StoreEasy 5000 Storage Quick Start Guide (B7E02-96027, June 2013)
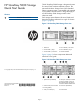


8. HP 4–port, 1 Gb Ethernet
PCI-e module
7. Power supply (2)
10. Management port for iLO
(servers 1 and 2), and Enclosure
Manager Unit (EMU)
9. HP 2-port, 1 Gb Ethernet I/O
module (connects to the
mezzanine NIC in each server
blade)
IMPORTANT: A System Recovery DVD is
included with your storage system. This DVD is
used to restore the storage system to factory
defaults and should be kept in a safe place.
Record network information
It is critical to have the correct networking information
available before proceeding with the system
installation and configuration. It may be necessary to
pre-stage DNS information. Contact your system
administrator to clarify network configuration
requirements.
IMPORTANT: Before joining the StoreEasy
system nodes to the Active Directory domain,
ensure that there is network connectivity between
each node and the domain controller.
The StoreEasy 5000 requires a minimum of 7 IP
addresses. These addresses may be statically assigned
or assigned by a DHCP server or both. If you are using
static addressing or a DHCP server that does not
automatically update DNS, ensure that both forward
and reverse DNS information (A and PTR records) is
pre-staged in the DNS server.
Use Table 1 (page 2) to document your network
information before proceeding with system setup.
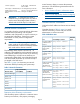
Table 1 Network information
IP address
Fully qualified DNS
name (FQDN)Network device
Enclosure Manager
Node 1 iLO
Node 2 iLO
Node 1
Node 2
Cluster
First file server
Restrictive Active Directory environments
If the StoreEasy system is placed in a restrictive Active
Directory environment, it may require pre-staging
Active Directory objects or certain administrative
permissions. See the following Microsoft articles for
more information:
• How to Create a Cluster in a Restrictive Active
Directory environment
• Failover Cluster Step-by-Step Guide: Configuring
Accounts in Active Directory
Validate network information
Confirm that the IP address and names are not already
in use.
Complete the tests in Table 2 (page 2) to verify
network connectivity. Consult with your network
administrator to confirm test results.
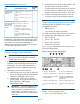
Table 2 Validation tests
Successful?
(Y/N)Command(s) to executeTest
ping <node 2 address>Ping the IP address
of Node 2 from
Node 1.
ping <node 2 name>
ping <node 2 fqdn>
Ping the name of
Node 2 from
Node 1.
ping <node 1>Ping the IP address
of Node 1 from
Node 2.
ping <node1 name>
ping <node1 fqdn>
Ping the name of
Node 1 from
Node 2.
nslookup <node 1
address>
nslookup <node 1 name>
Verify forward and
reverse DNS
information for
Node 1 is correct.
nslookup <node 1 fqdn>
nslookup <node 2
address>
nslookup <node 2 name>
Verify forward and
reverse DNS
information for
Node 2 is correct.
nslookup <node 2 fqdn>
ping <domain controller
address>
ping <domain controller
name>
Ping the domain
controller from
Node 1.
ping <domain controller
fqdn>
Page 2