
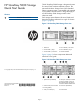
HP StoreEasy 5000 Storage Quick Start Guide (B7E02-96027, June 2013)


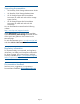

2. Power on the storage system by pushing the
power button (6, Figure 3 (page 3)) on the back
of the chassis.
NOTE: Approximately 30 seconds after
the storage system is powered on, the
server blades should start to power on
automatically. During this time, the
Enclosure Manager (EM) fault LED flashes
amber. After the EM has powered on, the
EM fault LED turns off and the EM health
LED turns solid green. Then, the server
blades start to power on.
Once the storage system power is on,
power on the server blades if they do not
automatically power on.
NOTE: The amber chassis fault LED (6,
Figure 1 (page 1)) flashes if any component
fault is detected by the System Management
Homepage. A fault can be as minor as a cable
unplugged from a NIC port, and therefore may
not be cause for concern.
Configure iLO and EMU network ports
1. Connect a system (the configuration system) in
the environment or a laptop to the EMU port (10,
Figure 2 (page 1)).
Use an Ethernet cable connected directly to the
system or through a switch.
2. Configure the NIC on your system to a static
address of 10.0.0.20 with the subnet mask
255.255.255.0.
3. Configure iLO on blade 1. Open a web browser
and log in to iLO using the address http://
10.0.0.11. You are prompted to enter the user
name and password. The password for the iLO
Administrator is located on a pull-out tab on the
front of the server blade. After logging in, HP
recommends that you change the Administrator
password. To do so, select Administration→User
Administration in the iLO management interface.
4. Configure the network as required for your
environment. Select Administration→Network in
the iLO management interface. You can either
enable DHCP or edit the IP address details and
enter site-specific network settings.
When you configure the iLO IP addressing to use
DHCP, ensure that you select the appropriate
DHCP addressing options for IPV4. Available
options are:
• Use DHCPV4 Supplied Gateway
• Use DHCPv4 Supplied Static Routes
• Use DHCPv4 Supplied Domain name
• Use DHCPv4 DNS Servers
• Use DHCPv4 Supplied WINS Servers
5. Click Apply to save your settings.
6. Configure iLO on blade 2. Open a web browser
and log in to iLO using http://10.0.0.12.
Repeat steps 4 and 5.
7. Connect to the Enclosure Manager software using
a secure shell application (PuTTY, for example).
Log in to the EMU with the EMU IP address
(10.0.0.10), port (22) and connection type (SSH).
When prompted, enter the EMU Administrator
password on the tear-away label attached to the
top left rear of the enclosure. Configure the
following:
a. Change your EMU Administrator password
by typing set password at the command
line prompt (optional).
b. To change the static IP address, type the
command set ipconfig static at the
command line prompt and follow the
instructions.
c. To change the EMU addressing to DHCP,
type set ipconfig dhcp at the command
line prompt. If you have a DHCP server in
your network, you can choose to assign the
IP address automatically by the DHCP server.
NOTE: You cannot connect to iLO or the EMU
from the configuration system until you change
the network settings on the configuration system.
HP recommends that you configure the EMU so that
administrators have remote network access to the unit.
See the HP StoreEasy 5000 Storage Administrator
Guide for network options.
Access the storage system
Configuration of the storage system, including the
cluster setup, is designed to be performed from a single
blade server. Connect to either one of the servers using
the remote console (iLO) or a local I/O diagnostic
(SUV) cable. The iLO remote console is the
recommended method. If you are using iLO, you must
have the EMU/iLO port (10, Figure 2 (page 1))
Page 4