
HP StoreEver MSL4048 Tape Library Getting Started (AK380-96016, December 2012)

5 Installing the library
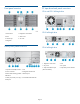
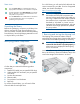
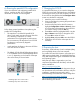
Slide the library onto the rails. Secure the front bezel
to the rack using a #2 Phillips screwdriver placed
through the small holes in the mounting bracket to
tighten the captive screws on each side of the library.
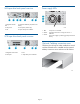
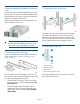
Optional: Adding a power supply
With the redundant power supply upgrade kit, the
library will continue to operate without interruption if
either power supply fails.
To install the redundant power supply, remove the
cover plate for the redundant power supply with a #2
Phillips screwdriver. Slide the power supply into the
bay until it is firmly seated. Tighten the three blue
thumbscrews with your fingers to secure the power
supply.
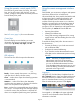
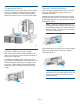
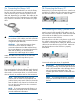
Optional: Adding a tape drive
With a tape drive upgrade kit, the library can hold
up to four half-height Ultrium tape drives or two
full-height tape drives.
Add the new tape drive directly above the currently
installed tape drive. Remove one drive bay cover for
a half-height tape drive or two drive bay covers for a
full-height tape drive.
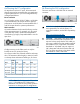
NOTE: The library will not operate with a
full-height tape drive installed in the second and
third half-height drive bays. Install a full-height
tape drive either in the bottom two drive bays
or the top two drive bays.
Slide the tape drive into the bay until it is firmly seated.
Tighten the blue thumbscrews with your fingers to
secure the tape drive.
NOTE: The tape drives are numbered from
the bottom up. If your library did not come with
a tape drive, install the first tape drive in the
bottom drive bay.
Page 7