
HP StoreEver Enterprise Systems Library (ESL) G3 Tape Library Controller Hardware Revision 2 Robot Replacement Instructions


Step 4: Installing the new robot
To install the new robot:
1. Lift the new robot carefully off of the floor.
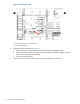
2. Referring to Figure 5, check the pin position in the X-preload tensioner to be sure the pin is still
in the hole and has not disengaged.
If the pin has dropped out, return to Step 6 under “Step 1: Unpacking and preparing the new
robot” (page 3).
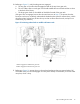
3. Engage the robot kickstand (see Figure 6):
a. Lift the picker by the yellow handle just above the kickstand engagement tab.
b. Pull the locking lever back, then lower the picker slightly until the lever engages, and the
picker is held in place by the kickstand.
c. Let go of the picker handle.
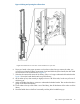
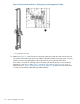
4. Holding the robot with two hands (one on the yellow handle and the other on the vertical rail in
the lift area shown in Figure 1), place the robot into the correct module directly under the loader
bracket:
CAUTION: Be very careful not to hit the robot against anything as you lift it into position. Do
not let go of the robot until it is hanging from the loader bracket.
a. In dual robot libraries, make sure you install the left robot in the left-most module and the
right robot in the right-most module.
b. Grasping the robot at the two lift points, lift the robot into a vertical position, with the collectors
facing toward the back of the library.
c. Insert the bottom of the robot into the library first, setting it down gently and carefully on the
floor of the library for just a moment.
d. Swing the top of the robot into the library.
e. Make sure the robot is vertical and directly underneath the loader bracket.
5. Lift the robot up, and insert the mushroom button into the big hole of the loader bracket. See
insertion point in Figure 9. Slide the robot back slightly until it hangs freely (not all the way back).
NOTE: The mushroom button appears loose and wobbles slightly. This is normal.
16 Step 4: Installing the new robot