
HP StoreEver Enterprise Systems Library (ESL) G3 Tape Library Controller Hardware Revision 2 Robot Replacement Instructions
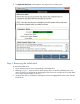
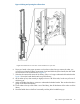

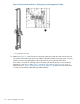

10. Referring to Figure 11, verify that the gears are engaged:
a. The top gear on the robot should engage the teeth of the top X-axis gear rack.
b. The two rubber rollers on each gear rack should straddle the non-notched rack that is closer
to the back of the library.
c. The larger gear wheel on the middle rail should be forward of the gear rack.
If the gears are not engaged, remove the robot and start over at Step 2. (To remove the robot,
first move it so that it is not directly underneath the loader bracket. Open the collector door, unlatch
the yellow plastic locking lever, lift the robot up so that its rollers clear the racks, and pull it out
of the library, top end first.)
Figure 11 Positioning robot wheels on middle and bottom racks
1. Rollers engaged on middle X-axis gear rack
2. Rollers engaged on bottom X-axis gear rack
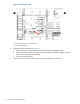
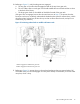
11. Referring to Figure 12, remove the pin in the pre-load mechanism that you inserted earlier. Pull
downward on the pin until it disengages. This may have already occurred after you slid the robot
into place, which is okay.
Step 4: Installing the new robot 19