
HP StoreEver Enterprise Systems Library (ESL) G3 Tape Library Controller Hardware Revision 2 Robot Replacement Instructions
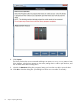
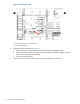
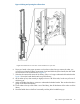

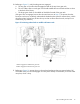
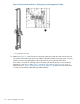

Figure 12 Gear pre-load mechanism—load position, pin disengaged (not in hole)
1. Pin disengaged (not in hole)
12. Referring to Figure 13, verify the robot is vertical by making sure that the robot vertical rails line
up with the white scribe lines on the top, middle, and bottom load position gear racks. You may
need to move the robot left slightly so the scribe lines are to the right side of the robot.
If the robot is not lined up vertically, remove the robot and reset the push pin in the X-preload
tensioner pin. See Step 6 under “Step 1: Unpacking and preparing the new robot” (page 3).
Afterwards, go to “Step 4: Installing the new robot” (page 16). (To remove the robot, first move
it so that it is not directly underneath the loader bracket.)
20 Step 4: Installing the new robot