
HP StoreEver Enterprise Systems Library (ESL) G3 Tape Library Controller Hardware Revision 2 Robot Replacement Instructions

If you cannot determine the problem, remove the robot from the library, and start over at Step 2.
(To remove the robot, first move it so that it is not directly underneath the loader bracket. Open
the collector door, unlatch the yellow plastic locking lever, lift the robot up so that its rollers clear
the racks, and pull it out of the library, top end first.)
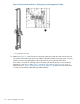
17. Referring to Figure 5, disengage the robot kickstand by lifting up on the yellow lever to release
the locking tab. Using the handle, raise the picker up approximately 50 mm (2 in) so that the
locking tab will not re-engage, then let go of the handle. The picker drifts to the bottom of the
robot.
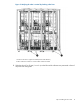
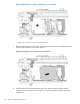
18. Referring to Figure 17, move the yellow plastic locking lever on the robot into the locked position.
Pull down on the knob to move the lever. Move the handle to the right to lock it snapped into
place. (When locked, the lever is under the middle rack support, which prevents you from lifting
the robot out.)
Figure 17 Setting robot locking lever in locked position
1. Robot locking lever in locked position
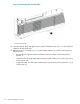
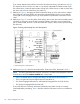
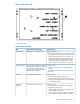
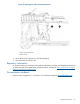
19. Referring to Figure 18, check the robot Status LEDs. There are six LEDs, described in Table 1.
NOTE: The library generates RAS events for open doors, but these should disappear when you
close the doors and press Robotics Enabled later in the process.
• If this is a left-side robot or a single robot library, the Left Position LED should be on.
• If this is a right-side robot, the Right Position LED should be on.
• The Sensors Engaged, Robot Power, and Robot Rail Engaged LEDs should all be ON.
• The Sensors Disengaged LED should be OFF.
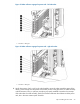
If any of the LEDs are incorrectly illuminated, troubleshoot and make sure all are correctly
illuminated before proceeding. Table 1 describes what the LEDs mean and how to troubleshoot
them.
24 Step 4: Installing the new robot