
HP StoreEver Enterprise Systems Library (ESL) G3 Tape Library Controller Hardware Revision 2 Robot Replacement Instructions
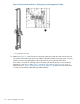
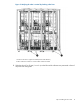
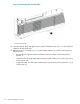
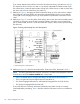
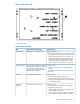
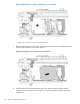
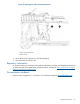

Figure 19 Robot lying on its side: restraint holes on rear of picker
1. Restraint holes, where the two posts of the robot restraint fit.
c. Place the restraint posts into the holes. It may help to push the picker toward the bottom of
the robot a few inches for more space to work.
Figure 20 Placing the robot restraint posts into the holes
d. Slide the picker and restraint toward the top of the robot until the two yellow restraint
thumbscrews are in position to be screwed in (on the front side of the robot). Tighten the
thumbscrews.
28 Step 5: Packing up the failed robot