
HP StoreEver Enterprise Systems Library (ESL) G3 Tape Library Controller Hardware Revision 2 Robot Replacement Instructions


NOTE: “Step 3: Removing the failed robot” and “Step 4: Installing the new robot” of this procedure
should, together, be performed in less than 10 minutes. When you reach Step 3, the library's local
User Interface (UI) provides a robot replacement wizard that includes a timer that counts down from
10 minutes. After 10 minutes, the library goes to a Not Ready state and any in-progress backup or
restore jobs may fail. However, within the 10 minute window in-progress commands can be queued
without affecting overall operation.
Plan your time inside the library to be as short as possible. To meet the time requirement, you must
get everything prepared for taking the library offline. Then efficiently remove and replace the robot,
and bring the library back online.
Required tools: None
Required equipment: Robot Assembly
The replacement procedure consists of the following steps:
• “Step 1: Unpacking and preparing the new robot” (page 3)
• “Step 2: Preparing the library” (page 9)
• “Step 3: Removing the failed robot” (page 13)
• “Step 4: Installing the new robot” (page 16)
• “Step 5: Packing up the failed robot” (page 27)
IMPORTANT: Before starting the replacement procedure for the first time, thoroughly review this
entire document.
Step 1: Unpacking and preparing the new robot
Before you begin, make sure you have enough room to work. You need a clear space to lay the new
robot down horizontally on the floor or on a table near the library from which you are removing the
failed robot. You also need a space nearby to lay the failed robot after you remove it from the library
and before you repackage it.
Be sure to save all the packaging to box up and return the failed robot.
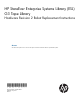
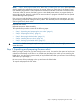
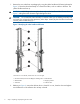
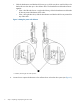
To unpack and prepare the new robot:
Step 1: Unpacking and preparing the new robot 3