
HP StoreEver Enterprise Systems Library (ESL) G3 Tape Library Controller Hardware Revision 2 Robot Replacement Instructions


1. Remove the new robot from its packaging by using the yellow handle and lift area (indicated in
Figure 1). Place the robot horizontally on a clean flat surface, such as a table or the floor. The
yellow handle must face up.
CAUTION: While lifting and moving the robot, only use the handle and the lift area shown in
Figure 1. Lifting from other locations might damage the robot.
CAUTION: Do not stand the robot vertically on its base unless you are holding it securely with
two hands. Do not lean the robot against any other object. Instead, lay the robot down horizontally
with the yellow handle facing up.
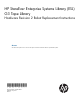
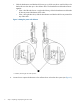
Figure 1 Identifying the robot handle and lift area
The front view is on the left, and the rear view is on the right.
2. Robot lift area1. Mushroom button (loose and wobbly) for installing robot
4. Shipping restraint3. Robot handle
6. Collector door5. Collectors
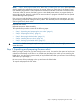
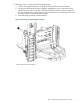
2. Referring to Figure 2, ensure the collector door is closed. If it is not, close the door and tighten
two thumbscrews in the collector door to keep it closed.
4 Step 1: Unpacking and preparing the new robot