
HP StoreEver Enterprise Systems Library (ESL) G3 Tape Library Controller Hardware Revision 2 Robot Replacement Instructions

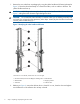
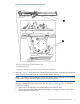
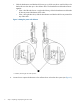
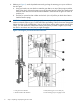
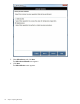

Figure 2 Closing and opening the collector door
View shows robot lying on side with handle facing up.
1. Robot handle facing up
2. Tighten these thumbscrews to close door. Loosen thumbscrews to open door.
3. Referring to Figure 3, set the power rail collectors to the correct position (right-side robot or left-side
robot) by sliding the thumbscrews up or down as described in this step.
NOTE: The collectors may already be in the proper position. If this is the case, you do not need
to move them, but you must verify that they are in the proper position.
There are four collectors. The bottom collector does not move. The other three slide up and down
vertically to engage the proper power rails. (See also Figure 15 and Figure 16.) To slide the
collectors up or down:
a. Loosen the two thumbscrews in the metal bracket on the collector door.
b. Use your fingers to lift the tabs of the bracket slightly to disengage the hole in the bracket
from the pin in the collector door.
Step 1: Unpacking and preparing the new robot 5