
HP StoreEver Enterprise Systems Library (ESL) G3 Tape Library Controller Hardware Revision 2 Robot Replacement Instructions

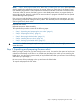
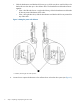

c. Slide the thumbscrews and bracket all the way up or all the way down until the hole in the
bracket fits over the other pin in the collector door. The thumbscrews and bracket all move
together:
• If this is the left-side robot or a single robot library, slide the thumbscrews and bracket
all the way toward the bottom of the robot.
• If this is the right-side robot, slide the thumbscrews and bracket all the way toward the
top of the robot.
Figure 3 Setting the power rail collectors
1. Brackets, left and right side robot positions
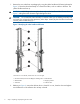
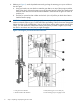
4. Loosen the two captive thumbscrews in the collector door so that the door opens (see Figure 2).
6 Step 1: Unpacking and preparing the new robot