
HP StoreEver Enterprise Systems Library (ESL) G3 Tape Library Controller Hardware Revision 2 Robot Replacement Instructions

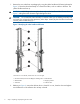
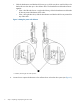
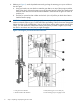

6. Referring to Figure 5, set the X-preload tensioner by pushing the retaining pin up into a hole on
the drive gear:
a. Using two hands, use one thumb to rotate the gear that sits on top of the spring toward the
back of the robot, while at the same time using the other hand to pull the drive shaft toward
the front of the robot until a hole becomes available in the bottom of the gear into which to
push the pin.
b. Push the pin upward so that it slides into the hole. (You will pull the pin back down later to
load the tension spring.)
CAUTION: Loading the tension spring properly ensures proper robot position and operation.
Make sure that the retaining pin is in the hole before proceeding. If the pin becomes disengaged
before the robot is fully installed (that is, the pin drops down and the gears engage with the gear
racks), you must remove the robot from the library and put the pin back in again. If you bump
the robot or set it down too hard, the pin might disengage.
Figure 5 Inserting the pin into the X-Preload tensioner
2. Hole (retaining pin is not in hole yet)1. Push gear in this direction
4. Push retaining pin up to engage in hole3. Pull drive shaft in this direction
8 Step 1: Unpacking and preparing the new robot