
HP StoreEver Enterprise Systems Library (ESL) G3 Tape Library Library Motor Drive Card Replacement Instructions (QN998-96093, May 2013)

Remove the existing LMD card
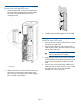
1. Locate the LMD card. It is the third card from the
left on the Library Management Module (LMM).
The LMM is located directly below the I/O
management unit.
1. LMD card
2. Lift the latch hooks out of the locked position and
push them up and away from the center of the
LMD card. You will feel the LMD card disengage
from the LMM unit backplane.
3. Carefully slide the LMD straight out of the LMM.
Install the new LMD card
1. Press up and out to open the latch hooks on each
side of the new LMD card.
2. Align the new LMD card with the guide slots in
card slot of the LMM. The LEDs should be on the
bottom of the LMD card.
CAUTION: Forcing the LMD card into the
slot can cause the pins to bend.
3. Apply pressure evenly to both sides of the LMD
card and slide it into the LMM until the latch hooks
begin to move towards the middle of the LMD
card.
4. Push the latch hooks towards the middle of the
LMD card and into the lock position. You will feel
the LMD card pins connect with the LMM
backplane as it locks into place.
Page 2