
e2400-160 Interface Controller

3
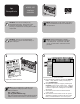
controller installation
Using a 5/32
inch Allen wrench,
open the center
back access door
or the right-hand
back access door,
depending on
your model.
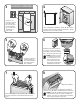
Using a flat blade screwdriver, loosen the two captive
screws at the top of the electronics bay frame. Tilt the
electronics bay out of the cabinet.
4
5
Hold the controller's
ejector handles so
they extend towards
the outer edges of
the controller.
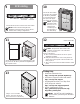
7
Press down gently on the controller until it is seated in
the edge connector and the ejector latches lock in
place.
Repeat steps 6 through 8 for additional controllers if
required, using the next available expansion cage slot.
Note: Only the first two slots in the expansion
cage should be used for shorter controllers as
needed. Do not try to install shorter controllers
in the longer expansion cage slots.
shorter controllers
8
With the SCSI ports located to
your left as you face the back
of the library, slide the controller
into a slot in the expansion cage.
Note: Ensure you have
an expansion cage with
a 2U filler panel. If you
have a 6U filler panel,
you will need to install
the 2U filler panel before
installing the controller.
6