
ESL 2U Filler Panel
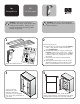

Secure the new filler
panel with two screws
on the top right of the
panel and two screws
on the front of the
expansion cage.
Note: When securing
the panel from the front
of the expansion cage,
the top screw is larger
than the bottom screw.
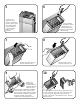
Install the new 2U filler
panel into the bottom two
slots of the expansion
cage. Inserting the edge
of the filler panel into the
card guide and slide it
down until it is fully seated.
Install the 6U slot covers as needed.
11
installing
2U filler panel
12
13
14
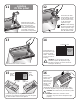
Inspect the pins on
the expansion cage
connectors where
shown. Ensure that
no pins are bent or
touching.
Caution: If a pin is bent in the area
indicated, replace the expansion cage.
Do not try to fix the pin as this will cause
damage to the library.
(Bottom of
expansion
cage)
Connector pins
15
Locate the guide pins for alignment. Lower the
expansion cage into the electronics bay into the guide
pin holes located on the PCI backplane.
Right
guide pin
Left guide
pin
Right
guide
pin hole
(Bottom of
expansion
cage)
Left
guide
pin hole
16
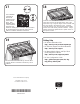
Press down
evenly on both
sides of the
expansion cage
until it is firmly
seated. Using
a Phillips
screwdriver,
reinstall the two top cover screws removed in step 7
to secure the expansion cage into the electronics bay.
Caution: Be careful not to pinch the fan power
cable.
Caution: Ensure the connectors on the
expansion cage and the PCI backplane align
properly.