
HP StoreEver 1/8 G2 Tape Autoloader and MSL Tape Libraries Fibre Channel Tape Drive Upgrade and Replacement (AH218-96032, June 2013)

Preparing to install the tape drive
Removing a tape drive
If you are replacing a tape drive:
• Make sure the tape cartridge has been removed
from the tape drive. Use the operator control
panel (OCP) or the remote management interface
(RMI) to move the cartridge to a storage slot or
mailslot.
• If you are replacing the tape drive in a single
drive unit or the master drive in a multi-drive unit,
verify that backups are not occurring on the drive
you are replacing. If backups are occurring on
the master drive, verify that the autoloader or
library will not be accessed through this drive
while the drive is being replaced.
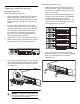
1. Use the OCP or RMI to power off the tape drive.
2. Verify that the tape drive assembly LED is off, and
then remove the FC cable from the tape drive.
3. Loosen the blue captive thumbscrews on the tape
drive. Pull straight back on the tape drive handle
while supporting the bottom of the drive to remove
it from the unit.
2
1
CAUTION: Support the bottom of the tape
drive when removing it to avoid damaging
any of the internal connections.
Removing a drive bay cover
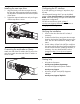
1. Identify the location for the tape drive. If this is
the first tape drive, install it in the bottom drive
bay. Otherwise, install the new drive in the next
higher drive location.
Most MSL tape libraries have half-height drive
connectors in all drive locations. The MSL8048
and MSL8096 libraries only have drive
connectors in the full-height drive locations. For
these libraries, leave a half-height space above
each half-height drive, as shown.
2. Using a #2 Phillips screwdriver, remove one
half-height drive bay cover to install a half-height
drive or two half-height covers to install a
full-height drive.
1
1
2
Page 2