
HP StoreEver 1/8 G2 Tape Autoloader and MSL Tape Libraries Fibre Channel Tape Drive Upgrade and Replacement (AH218-96032, June 2013)

Installing the new tape drive
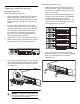
1. Align and slowly insert the new tape drive into
the drive bay while supporting the drive assembly.
The tape drive should be flush with the back panel
of the device.
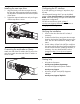
2. Tighten the captive thumbscrews with your fingers
until the tape drive is secure.
1
2
Connecting the autoloader or library
Attach one end of the FC cable to the FC port on the
tape drive. Attach the other end of the FC cable to a
switch or HBA.
Configuring the FC interface
If you are replacing an existing FC tape drive, skip
this step.
HP recommends leaving the FC port at the default
settings of Port Speed: Automatic and Port Type: Auto
Detect. With these settings, the tape drive will use the
appropriate configuration.
See the user and service guide at http://
www.hp.com/support/manuals for instructions on
changing the FC configuration.
Verifying the installation
1. Power on the drive from the OCP or RMI, if
necessary.
2. Confirm that the library recognizes the new tape
drive by checking the System Status screen on the
OCP. The new drive should show Ready or RDY
status.
3. Use HP Library & Tape Tools (L&TT) to verify that
the system sees the tape drive and that tape drive
has the current firmware. Update the firmware, if
necessary. You can download L&TT without
charge from http://www.hp.com/support/
TapeTools.
Getting help
• HP product information:
www.hp.com/products/tapestorage
• HP technical support and phone numbers:
www.hp.com/support
• HP Library & Tape Tools (L&TT) diagnostic
software:
www.hp.com/support/TapeTools
Page 3