
HP StoreEver 1/8 G2 Tape Autoloader and MSL Tape Libraries User and Service Guide Addendum (AK378-96068, September 2013)

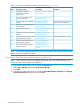
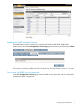
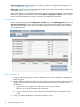

Table 1 Enrolling the autoloader or library with a KMIP server (continued)
Comment
Primary documents providing
more detailDescription of taskStep
“Installing the KMIP encryption
license” (page 7)
Install the HP StoreEver
MSL2024/4048/8096
KMIP license.
4
“Set or enter the KMIP security
password” (page 7)
Set or enter the KMIP security
password in the RMI.
5
The user name will also be used to
generate the client certificate.
“Entering the KMIP client
credentials” (page 8)
Enter the KMIP Client Credentials in
the RMI.
6
“Generating the client certificate
request” (page 8)
Generate the autoloader or library
client certificate.
7
“Signing the client certificate on
the server” (page 8)
Sign the client certificate.8
“Installing the signed client
certificate” (page 9)
Install the signed client certificate in
the RMI.
9
Enter the IP addresses from step 1.“Configuring access to the key
servers” (page 9)
Configure the accessible key servers
for the autoloader or library.
10
“Enabling KMIP-based
encryption” (page 9)
Enable KMIP-based encryption for
the autoloader or library.
11
“Verifying that the KMIP
integration feature is working”
(page 9)
Verify that the KMIP encryption
feature is working.
12
NOTE: HP does not supply the KMIP server. If you are not familiar with configuring KMIP servers,
please contact your KMIP server vendor.
Creating the client user name and password on the server
NOTE: These instructions are for the SafeNet KMIP server. If you are using a different server,
consult your server documentation for instructions.
1. Log into the SafeNet KMIP server and select the Security tab.
2. In the Users & Groups panel select Local Users & Groups.
3. Click Add.
4. Enter the user name and password, and set the User Administration Permission and Change
Password Permission settings and then click Save.
6 Using a KMIP-based key server