HP StoreOnce Backup system Conversion from 2.x.x software to 3.4.x (or later) software user guide Abstract HP is offering existing StoreOnce D2D Single Node customers the ability to convert their appliance's existing software from 2.x.x to the new 3.4.x (or later) StoreOnce software for free. HP StoreOnce 3.4.x (or later) software is significantly different to 2.x.x software and, as such, the conversion process is data and configuration destructive.
© Copyright 2012 Hewlett-Packard Development Company, L.P. Confidential computer software. Valid license from HP required for possession, use or copying. Consistent with FAR 12.211 and 12.212, Commercial Computer Software, Computer Software Documentation, and Technical Data for Commercial Items are licensed to the U.S. Government under vendor's standard commercial license. The information contained herein is subject to change without notice.
Contents 1 Introduction...............................................................................................5 Product Naming.......................................................................................................................5 Products that are not supported..................................................................................................5 How do I tell whether I have a supported D2D4106fc product?..................................................
8 Documentation feedback...........................................................................29 A HP StoreOnce 2.x.x to 3.x.x Software Conversion Checklist...........................30 Conversion steps....................................................................................................................30 Settings to be restored during or after conversion........................................................................
1 Introduction HP is offering existing StoreOnce D2D Single Node customers the ability to convert their appliances from 2.x.x software to the next generation of StoreOnce software for free. HP StoreOnce 3.4.
Look at the Summary section of the Home page to find out whether you have the Gen 2 (unsupported) or Gen 2E (supported) model. EH998B: HP StoreOnce D2D4106fc Backup system, Gen 2E (G02–E), conversion to 3.x.x supported nl EH998A: HP StoreOnce D2D4106fc Backup system, Gen 2 (G02), conversion to 3.x.x not supported nl How do I tell whether I have a supported D2D4112 product? EH993B is the older version of the HP D2D4112 Backup system, also referred to as Gen 2.
Table 2 Part numbers for Catalyst licenses (continued) Part number Catalyst license BB860AAE HP StoreOnce Catalyst 4200 O.S.T. E-LTU BB861AAE HP StoreOnce Catalyst 4200 DP E-LTU BB862AAE HP StoreOnce Catalyst 4400 O.S.T. E-LTU BB863AAE HP StoreOnce Catalyst 4400 DP. E-LTU NAS and VTL backup targets 3.x.x StoreOnce software continues to support NAS (CIFS and NFS) and VTL (Virtual Tape Library) functionality that was previously available in products running 2.x.x software.
Network Support The 3.4.x (or later) software supports a similar set of configuration modes for both 1GbE and 10GbE networks, significant differences being: • Configuration of networking is currently via the StoreOnce CLI interface only • IPv6 support is not currently available • A single failover and port aggregation port bonding mode is provided rather than the two discrete modes provided in previous software GUI differences The StoreOnce GUI with 3.4.
2 Before converting to 3.4.x (or later) software Important — please read before converting CAUTION: This conversion process is data destructive. The conversion process will require both a hardware change and a complete software re-install. Any backup data will be ERASED at the start of the install process, there is no way to retain your data through this process other than by replicating you data to another StoreOnce appliance prior to conversion and then recovering it afterwards.
Pre-requisites for conversion Before starting the conversion process you will require the following: • Physical access to your StoreOnce appliance. You will need to remove it from the rack so will need a screwdriver, and the provided hex key to open the lid. Remember that the appliance is heavy and it is a two person operation to safely remove it from the rack. • A blank 4GB or larger USB flash stick.
Retaining your data via StoreOnce Replication If you are already using replication to provide an off-site copy of the data being backed up to the appliance that you are converting, this is the best way to migrate data back onto the appliance after conversion completes. If you are not currently using replication but have other HP StoreOnce appliances available, these could provide you with a way to retain your data over the conversion process. Some important points to note are: 1.
3 Firmware component update Before starting the conversion process you must ensure that all system hardware components have up-to-date firmware. Go to www.hp.com/go/support/downloads and type the name of your existing HP StoreOnce D2D Backup System product into the search box to locate the component firmware bundle for your product and the system BIOS. You will need to power off the HP StoreOnce D2D Backup System.
4 Hardware modification WARNING! The units are heavy and require a two-person lift. HP StoreOnce 25xx and 41xx products are fitted with friction rails, so cannot be extended out of the rack. They must be removed completely. CAUTION: The conversion process is data destructive, do not proceed any further if you need to retain any of the backup data on the StoreOnce appliance that is running 2.x.x software. NOTE: See also Conversion checklist (page 30).
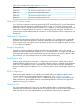
Figure 1 HP StoreOnce D2D4312/4324 Backup System location of flash module Figure 2 HP StoreOnce D2D4106/4112 Backup System location of flash module Figure 3 HP StoreOnce D2D2502/2504 Backup System location of flash module 14 Hardware modification
7. Remove the Flash Memory stick (1) and store safely, in some cases a Velcro™ tie will need to be unfastened to remove the stick. (It is not recommended that this USB stick is used for the 3.x.x install image.) NOTE: The memory module for the HP StoreOnce D2D4112/4106 and the HP StoreOnce D2D2502/2504 has a cable. It should not be necessary to remove this. If you do so, first unscrew the bracket (2) holding the USB connector and then disconnect the cable from the motherboard (3). 8. 9.
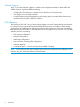
Figure 6 HP StoreOnce D2D2502/2504 Backup System location of 1GbE network ports 1 16 LAN port 1 connector (1GbE), connect for easy install Hardware modification 2 LAN port 2 connector (1GbE)
5 Software Installation and configuration The steps in the software installation and configuration are as follows: • Download the 3.4.x (or later) “Quick Restore” ISO image and copy to a USB Flash stick. • Delete existing storage logical drives. • Boot the appliance from the QR Flash Stick and perform the software install. • Perform first boot appliance configuration. • Configure Network Settings. • Apply capacity and replication licenses. • Configure appliance storage.
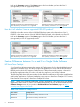
7. 8. 9. Insert a blank 4GB USB key when prompted. This USB key must not contain any previously configured Linux partitions, it may contain a single FAT32 partition which will be overwritten. On the Select Media page choose Browse for ISO file and locate the downloaded QR image. Choose the drive letter of the USB key media to be used. Proceed with the USB Key creation. NOTE: The process takes several minutes to complete the creation.
4. Select the highest number logical drive (in the example below select Logical Drive # 4) and press F8 to delete it. Then confirm the deletion with F3. 5. 6. 7. Work up the list of logical drives deleting them all. Exit the Option ROM configuration for this controller. Wait for the next controller (depending on the StoreOnce product model there will be between 1 and 4 Smart Array controllers) to be discovered and repeat the Logical Drive deletion process.
Boot the appliance and install the StoreOnce 3.x.x Software 1. Make sure that power, network, keyboard and monitor, and all expansion enclosures are attached to the StoreOnce appliance that you are converting. Insert the QR USB stick into one of the front or rear USB port and power on the system. IMPORTANT: The QR USB stick should be the only USB storage device attached to the appliance.
Configure network settings At this point the appliance is ready to be accessed over a network using the StoreOnce CLI or GUI. After conversion the appliance 1GbE network will be enabled on Port 1 and it will be configured in DHCP mode.
1. Prepare storage. After the delete command has completed, build the storage system using the following StoreOnce CLI command to discover and add storage to the system: hardware prepare storage This command will return quickly once prerequisite checks are completed but the process of actually creating the LUNs may take several minutes to complete depending on the amount of storage being added. If successful, this command will return “Command Successful.” The command will fail if: 2.
Configure other appliance settings and create backup targets Your StoreOnce Appliance is now converted to 3.4.
6 Troubleshooting Problem The system boots from the QR USB flash drive, but fails after the “hit R to restore” prompt with the following error. Solution: The QR USB stick should be the only USB storage device attached to the appliance. Ensure that there are no other USB sticks attached and remove any integrated KVM devices which may be presenting storage devices to the appliance.
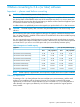
Figure 7 Cabling showing the SAS expander card Figure 8 Cabling showing the backplanes 25
7 Support and other resources Contacting HP For worldwide technical support information, see the HP support website: http://www.hp.com/support Before contacting HP, collect the following information: • Product model names and numbers • Technical support registration number (if applicable) • Product serial numbers • Error messages • Operating system type and revision level • Detailed questions New and changed information in this edition This is the first edition.
Typographic conventions Table 5 Document conventions Convention Element Blue text: Table 5 (page 27) Cross-reference links and e-mail addresses Blue, underlined text: http://www.hp.
Some parts do not qualify for CSR. Your HP-authorized service provider will determine whether a repair can be accomplished by CSR. For more information about CSR, contact your local service provider, or see the CSR website: http://www.hp.
8 Documentation feedback HP is committed to providing documentation that meets your needs. To help us improve the documentation, send any errors, suggestions, or comments to Documentation Feedback (docsfeedback@hp.com). Include the document title and part number, version number, or the URL when submitting your feedback.
A HP StoreOnce 2.x.x to 3.x.x Software Conversion Checklist Print out and fill in this checklist as you go through the conversion process to ensure that you do not miss any steps. The checklist is followed by a table where you can record existing settings that you will need to restore after conversion. WARNING! HP StoreOnce 3.4.x (or later) software is significantly different to 2.x.
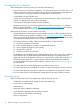
Settings to be restored during or after conversion Table 7 Configuration settings General network settings DNS Addresses Default Gateway Address Network settings Subnet 1 DHCP or Static Addressing IP Address Netmask Gateway Address Domain Name DHCP or Static Addressing IP Address Netmask Gateway Address Domain Name Network settings Subnet 2 DHCP or Static Addressing IP Address Netmask Gateway Address Domain Name DHCP or Static Addressing IP Address Netmask Gateway Address Domain Name Network settings Subnet
Table 7 Configuration settings (continued) Network settings Subnet 4 DHCP or Static Addressing IP Address Netmask Gateway Address Domain Name DHCP or Static Addressing IP Address Netmask Gateway Address Domain Name SNMP trap settings SNMP destination address Read Community String Write Community String Email alerts SNMP Server name/address Sender Account Reply to Acccount Recipient addresses 1 Recipient addresses 2 Recipient addresses 3 Replication Replication Target Appliance 1 Replication Target Appliance
Table 7 Configuration settings (continued) Licenses Capacity License File(s) Replication License File Settings to be restored during or after conversion 33