
HP StoreOnce VSA Backup System User Guide (TC458-96025)

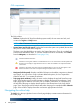

GUI components
The GUI includes:
• Title bar: Displays the HP StoreOnce Backup system model, the user name and role, and
contains the Logout and Help buttons.
NOTE: After 15 minutes of inactivity, the session times out and returns to the Login screen.
• System Status (top left side panel): Displays the last time the system was updated (the machine
time) and a count of event status categories.
The three icons described below are used in the System Status area. They do not identify the
event that has affected the status. To view the individual events for more detail, select Events
from the Navigator, as described in Events (page 124).
Indicates standard information.
Indicates a warning state. Attention is needed but the error is not critical to the successful operation of
the device. For example, a single disk failure occurs or disks are installed in an expansion shelf but
not licensed.
Indicates a critical state. The system requires immediate attention. This icon may also appear in the
Details area of the screen with a red square background (rather than a red circle).
• Navigator (left side panel): Displays available GUI topics and enables navigation to selected
topic pages. A + sign next to a topic indicates additional options; click + to expand the
selection and click — to contract the selection.
• Topic page (main window): Initially, the main window displays the top-level StoreOnce topic
page. Select another topic from the Navigator to display the page for that selection. Some
Topic pages require selection of an item, such as a library, NAS share, or Catalyst store in
the top half of the page to display details specific to the selected item in the lower half of
page. Some Topic pages include multiple tabs within the page, for example the VTL—Libraries
page. Select a tab to display information and actions appropriate to that tab.
Navigating the online help
The Help link in the top right-hand corner of each page displays context-sensitive information for
the current page.
10 Getting started