
HP StoreOnce VSA Backup System User Guide (TC458-96025)


Creating NAS shares
Users with an Admin login may create NAS shares. The process varies slightly depending upon
whether creating a CIFS or NFS share, see:
• CIFS: Creating a CIFS share (page 45)
• NFS: Creating an NFS share and setting permissions (page 47)
Shares can be configured as version 2 (default) or version 1. The difference is in the maximum
number of files per share permitted: 25,000 for version 1 shares and 1,000,000 for version 2
shares. Configuring a version 1 share is only recommended for replication compatibility with
another appliance on an older software version that only supports version 1 shares. Once
configured, you can change the share version from 1 to 2 but you cannot change from 2 to 1. The
maximum number of shares depends upon the product model and the number of other devices
(including VTL libraries and Catalyst stores) already created. See StoreOnce key
parameters (page 137).
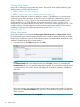
Editing share details
Users with an Admin login may edit the Description, Write Protection, and Secure Erase settings
for existing NAS shares. Write protection prevents access initially or protects data after it has been
backed up for compliance purposes. Data at Rest Encryption cannot be edited; that feature is only
enabled or disabled at the time of share creation.
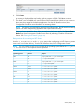
1. Select the share on the Shares page and click Edit.
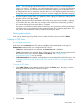
NOTE:
The Network Path field is not displayed when you select Edit. However, if you display the
Network Paths tab, you can copy the share path if required. If your StoreOnce Backup system
is configured on a Virtual LAN, this tab will display all the VLAN IP addresses available for
that share.
If the correct license was applied, enable Secure Erase by selecting the number of Overwrite
Passes from the Secure Erase Mode drop down box. This field does not appear until after the
share is created.
2. Make the required changes and click Update.
44 NAS functions