
HP StoreOnce VSA Backup System User Guide (TC458-96025)
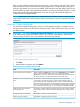
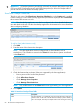
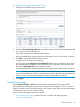
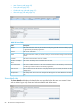


Table 23 Store details
DescriptionField
The name of the store. This may be created manually through the HP StoreOnce Backup system
or generated by the backup application.
Name
A description for the store.Description
The retention period for information about data jobs. This information is displayed on the Data
Jobs tab, which provides a log of all data job activity. The default is 90 days.
Data Job Retention
Period (Days)
The retention period for information about inbound copy jobs. This information is displayed
on the Inbound Copy Jobs tab, which provides a log of all data job activity. The default is 90
days.
Inbound Copy Job Log
Retention Period
(Days)
The retention period for information about outbound copy jobs. This information is displayed
on the Outbound Copy Jobs tab, which provides a log of all data job activity. The default is
90 days.
Outbound Copy Job
Log Retention Period
(Days)
This may be High or Low.Primary (Default)
Transfer Policy
• High means all data is sent from the media server and deduplicated on the HP StoreOnce
Backup system. This can also be described as target-side deduplication.
• Low means that the media server deduplicates the data and sends only unique data. This
can also be described as source-side deduplication.
The primary transfer policy is the default transfer policy for the server. Each media server may
be configured individually to use the most efficient transfer policy. As long as the two transfer
policies have different values, the media server will determine which is the most bandwidth
efficient transfer policy to use.
This may be High or Low (see definitions in row above) and is normally the opposite to the
Primary transfer policy so that the media server can choose to use which is most appropriate.
Secondary Transfer
Policy
However, if you wish to enforce the transfer policy that the media server uses, set both Primary
and Secondary transfer policies to the same value.
Once the library is created and the correct license is applied, the Secure Erase Mode box
appears on the Store Details tab. The selection box defaults to None, meaning Secure Erase
Secure Erase Mode
is disabled. To enable Secure Erase, select the preferred number of Overwrite Passes (1, 3,
5, or 7). If enabled, this feature allows you to securely erase confidential data that may have
unintentionally been backed up as part of a regular backup job. See “Security
Features” (page 12) and “Licensing” (page 12) for more information.
To create a new store (administrators only)
1. Click Create at the top right of the StoreOnce Catalyst Stores page.
2. Provide the store details as described in Table 23 (page 89).
NOTE: If the proper license was applied, an Encryption Enabled check boxis displayed. To
enable encryption for the new store, you must do it at this time by checking the Encryption
Enabled box. See “Security Features” (page 12) and “Licensing” (page 12) for more
information.
When you have completed the store details, click Create.
Catalyst Stores page 89