HP StoreOnce Backup system service and maintenance guide for HP StoreOnce 4900 Backup Abstract This is the Maintenance and Service guide for the HP StoreOnce 4900 Backup products. These products are also sometimes referred to as StoreOnce Backup single node rack products.
© Copyright 2014 Hewlett-Packard Development Company, L.P. Confidential computer software. Valid license from HP required for possession, use or copying. Consistent with FAR 12.211 and 12.212, Commercial Computer Software, Computer Software Documentation, and Technical Data for Commercial Items are licensed to the U.S. Government under vendor's standard commercial license. The information contained herein is subject to change without notice.
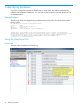
Contents 1 Spares part numbers for field replacement.....................................................5 HP StoreOnce 4900 44TB Backup head server ...........................................................................5 HP StoreOnce 4900 disk enclosure.............................................................................................6 2 General information....................................................................................8 Performance best practices.........................
To install the drives.............................................................................................................28 If multiple disks fail and a RAIDset is broken..............................................................................30 9 The QR ISO image...................................................................................31 Download Quick Restore ISO Image ........................................................................................
1 Spares part numbers for field replacement This is the Service and Maintenance Guide for the HP StoreOnce 4900 Backup. The information in the appropriate ProLiant Maintenance and Service Guide should be the primary reference source for hardware issues on the related StoreOnce Backup System. Spares part numbers are available in the ProLiant guides. This guide contains only information that is not included in the ProLiant documentation.
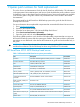
Table 1 HP StoreOnce 4900 head server spares part numbers (continued) Part Description Part number 10Gb Ethernet SFP+ ASSY, 10Gb SR SFP+ 455885–001 10 GbE card (two per system) HP NC552SFP Dual Port 10GbE Server Adapter 615406–001 Figure 1 Rear view of the head server 1. RAID card 1 2. FC card 1 3. FC card 2 4. RAID card 2 5. 10GbE card 1 6. 10GbE card 2 7. Power supply 1 8. Power supply 2 9. USB ports 10. Video/monitor port 11.
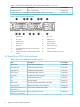
Figure 2 Rear view of the disk enclosure 1. Power supply 2. Drawer 2, IO module A 3. Drawer 2, IO module A, Port 1 4. Drawer 2, IO module A, Port 2 5. Power supply 6. Drawer 1, IO module A 7. Drawer 1, IO module A, Port 1 8. Drawer 1, IO module A, Port 2 9. Drawer 1, IO module B, Port 1 10. Drawer 1, IO module B, Port 2 11. Drawer 1, IO module B 12. Power supply 13. Drawer 2, IO module B, Port 1 14. Drawer 2, IO module B, Port 2 15. Drawer 2, IO module B 16.
2 General information NOTE: Make sure you have the correct Maintenance and Service guide for your product. There are a number of different models, and each has its own guide. Performance best practices HP recommends that you review HP StoreOnce Backup system Concepts and Configuration Guidelines, describing simple steps that can be performed to ensure that your HP StoreOnce Backup System is optimized as efficiently as possible. You can view this document from http://www.hp.com/support/.
Tasks that are unique to HP StoreOnce Backup The following tasks are described in this guide: • How to replace the motherboard • How to replace the HP RAID controller • How to replace the Cache module and SuperCapacitor • How to replace removable hard disks Rack stability Rack stability protects personnel and equipment. WARNING! To reduce the risk of personal injury or damage to equipment: • Extend leveling jacks to the floor.
3 Identifying problems If you have configured recipients for SNMP traps or email alerts, they will be notified of any problems with hardware components. You can also use the StoreOnce GUI and StoreOnce CLI as described below. Example alerts The following alerts were triggered by a problem with a failed disk in an HP StoreOnce 4900 Backup system. The following event occurred: hardwarecomponent.
Hardware tree NOTE: The disks in a head server unit are different to those in the expansion shelf. Be sure to order the correct replacement disk. The following example shows the Hardware tree expanded to show the disk failure in a disk enclosure drawer. Using the StoreOnce CLI The following StoreOnce CLI commands can also be used to identify hardware problems and to walk through the hardware tree to obtain more details about a specific component.
# hardware show status 051662fb-0000-1000-b027-53344a303131 Name -------------------p1228 Storage System Enclosure Pools Controller 1 Dev-id -----------------------------------051662fb-0000-1000-b027-53344a303131 CZ3320E200 pools-1 5001438025A26200 Status -------DEGRADED DEGRADED OK OK # hardware show status CZ3320E200 Name ----------------------Disk 5000C50055C1BB0B - 3.
4 Replacing the system motherboard For all products, refer to the appropriate ProLiant Maintenance and Server Guide for detailed instructions on replacing the motherboard. IMPORTANT: If the status of the cache module on the failed motherboard is OK, transfer it to the replacement motherboard. When replacing the motherboard make sure that all items on the old motherboard are re-installed on the replacement motherboard, for example the SAS cables that connect to the internal disks in the server.
The locations of DIMM slots are also shown on the StoreOnce hood label inside the server. Before replacing the motherboard—iLO4 licenses All products are shipped with paper copies of the iLO4 licenses. If you no longer have these licenses and the board is still working for the iLO4 GUI connection via its management Ethernet port, make a note of the license before you remove the motherboard. (If it is not working, contact HP Support.) 1. Log on to the iLO4 GUI. 2. Select the Administration Tab. 3.
Table 4 RBSU settings for HP StoreOnce 4900 (continued) Top Menu Item Sub Menu 1 Sub Menu 2 Server Asset Text Server Info Text Other Text Advanced Options Thermal Configuration Service Options Change to Ensure the field has no text, i.e. it is blank Increased Cooling Serial Number The serial number for the HP StoreOnce Backup. Product ID 746355-B21 4. 5. 6. Exit RBSU. Boot the operating system. Check that an existing iLO4 Advanced license is loaded. If it is not, add it: a.
5 The HP p1228 RAID controller Overview The HP StoreOnce 4900 Backup system uses the HP p1228 RAID controller fitted with a RAID cache module and SuperCapacitor. The HP StoreOnce 4900 Backup has two RAID controllers. Cables connect the external SAS ports on the controller to the SAS storage in the disk enclosure(s).
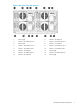
Location of the RAID cards (server rear view) Figure 5 HP StoreOnce 4900 models, location of the p1228 controllers 1 RAID controller in PCIe slot 1 2 RAID controller in PCIe slot 4 WARNING! To reduce the risk of personal injury or damage to the equipment, consult the safety information and user documentation provided with the server and p1228 controller before attempting the installation. RAID card ports Figure 6 Port numbering on the RAID card 1. Port 1E 2.
2. 3. Locate the p1228 controller card and detach the cables connecting it to the SuperCapacitor and to the external SAS storage. (The StoreOnce 4900 Backup has two RAID cards; be sure to identify which slot contains the failed card.) Unclip the blue retaining latch on the PCIe card (1 and 2) and remove the PCIe card (3). Figure 7 Removing a p1228 card 4. 5. Move the cache module from the failed p1228 card to the new card in case there is any data that has not been written to disk.
9. warning events will be generated and the GUI Event Log will show errors being reported and cleared. Run the StoreOnce CLI command, hardware show firmware node, to check that the firmware on the new RAID card is correct; it will be listed under the node (server) details. Run the StoreOnce CLI command, hardware update firmware node, with appropriate parameters to update it, if necessary. See the HP StoreOnce Backup CLI Reference Guide for more details.
6 RAID cache module and SuperCapacitor failures Spares part numbers NOTE: Never move cache modules from one RAID controller to another within or between systems. The replacement spares part numbers are: • SuperCapacitor, spares part number 660093–001 • RAID cache, spares part number 633542–001 If replacing this module does not resolve the problem, it may be necessary to replace the RAID controller card. See the previous chapter for more information about replacement procedures and spares part numbers.
System URL(s): http://_IP_Address1>, http:// component:superCapacitor, status:MISSING, location:superCapacitor in storageController S/N:PCUUVX58S4B004 in PCI Slot 4 in server HPCZ225101H9, Message: The supercap is missing or has failed., Diagnostic message: Check the connections to the supercap. If the supercap is fully connected, replace the supercap.
Replacing the RAID cache module and SuperCapacitor NOTE: The recommendation is to replace both the SuperCapacitor and RAID cache module at the same time, regardless of which element has failed. RAID cache module and SuperCapacitor location There is one SuperCapacitor and cache module for each RAID Controller. (This means the HP StoreOnce 4900 Backup has two modules.
7 Disk enclosures The standard documentation supplied with field replacement parts for the disk enclosures provides all the required details, with the following important exception. IMPORTANT: The following parts are not hot-pluggable. The system must be taken offline before replacing them. • I/O module (controller board) • SAS cable from RAID controller card to the disk enclosures NOTE: Before replacing any I/O modules or SAS cables thoroughly check that all cables are fully seated and connected.
8 Disk replacement This chapter describes: • The storage RAID configuration • How to identify a failed disk • How to replace a disk • How to rebuild the RAID if several disks fail NOTE: For instructions on how to connect additional storage by installing a StoreOnce 4900 Backup 44TB or 60TB capacity expansion kit, please see the printed documentation supplied with the additional storage.
Figure 11 Drives page on StoreOnce GUI Distributing the disk drives correctly The initial eleven disks (plus four hot-plug disks) in the disk enclosure are installed and pre-configured as follows when the HP StoreOnce 4900 Backup is installed. Table 5 Disk bays populated at installation Disk Enclosure 1 Initial storage configuration Drawer 1 Drawer 2 Two spare hot disks in bays 34 and 35 and eleven disks in slots 23-33. Two spare hot disks in bays 34 and 35.
Figure 13 Disk labeling for drawer 2 Table 6 Populating disk bays with Capacity Expansion kits Drawer 1 Drawer 2 + Expansion kit 1 Do not change Add eleven disks to slots 23-33 + Expansion kit 2 Add eleven disks to slots 12-22 Do not change + Expansion kit 3 Do not change Add eleven disks to slots 12-22 + Expansion kit 4 Add eleven disks to slots 1-11 Do not change + Expansion kit 5 Do not change Add eleven disks to slots 1-11 Ordering the correct replacement disk for a failed disk IMPORTA
Using the Management console If you have configured recipients for SNMP traps or email alerts, they will be notified of a disk failure. You can also use the GUI as follows: • Go to the appropriate Hardware page to get the details for the device: Hardware — Storage Clusters — Storage Cluster n — Drive Enclosure — Sub Enclosure (Drawer n) — Drives. The disk fault LED (amber) will also be illuminated on the disk carrier.
To install the drives 1. Identify which drive needs replacing and its drawer and bay location. This information may be provided from SNMP alerts or from the StoreOnce GUI on the Events or Hardware pages. For example, expand the Hardware tree until you locate the item that has failed. TIP: You may need to expand the Location column to identify the bay to which the drive belongs. (Port identifies which of the two ports on the RAID controller the disk enclosure is connected to and Box identifies the drawer.
3. Press the button (1) to release the eject lever. Pull out the disk carrier handle (2) and slide the hard drive assembly (3) out of the drive bay. Be sure to support the drive when pulling it out of the bay. Figure 15 Removing the drive 4. Press the button (1) to release the carrier handle (2). Insert the hard drive (3) and close the carrier handle (4).
5. Close the hard drive drawer. You will hear it click into place when it is securely closed. The fans will return to normal speed when both drawers are properly closed. WARNING! Pinch hazard—Keep hands out of front and rear of chassis when closing hard drive drawers. CAUTION: To prevent improper cooling and thermal damage, do not operate the disk enclosure for an extended period of time with the drawer open.
9 The QR ISO image In the rare occurrence of a complete system failure it may be necessary to re-install the product software. This task is normally carried out on the recommendation and under the supervision of HP Support. CAUTION: The Quick Restore process will delete all stored data and configuration settings returning your product to factory default settings.
Boot the appliance and install the StoreOnce software Make sure that power, network, keyboard and monitor, and all expansion enclosures are attached to the StoreOnce appliance, then insert the QR USB stick into one of the front or rear USB ports and power on the system. After the system powers up and completes self-tests it will boot from the USB key and launch the Linux installation process. After a few seconds a boot splash screen will appear offering the choice of Restore (R) or Exit (E).
3. Using the latest .txt file, manually apply all of the settings within this configuration text file using the StoreOnce CLI commands and instructions exactly as shown. This will ensure that the customer configuration is restored to its previous configuration. It is very important that this is done manually before attempting to restore the device settings automatically. NOTE: If the product has additional storage connected, please ensure Capacity Upgrade Kit licenses are applied. 4.
This will restore device settings for the appliance. 9.
10 Support and other resources Contacting HP For worldwide technical support information, see the HP support website: http://www.hp.com/support Before contacting HP, collect the following information: • Product model names and numbers • Technical support registration number (if applicable) • Product serial numbers • Error messages • Operating system type and revision level • Detailed questions New and changed information in this edition This is the first edition.
• HP Technical Support website: http://www.hp.com/support • Net-SNMP website: http://www.net-snmp.org • Single Point of Connectivity Knowledge (SPOCK) website: http://www.hp.com/storage/spock • White papers and Analyst reports: http://www.hp.com/storage/whitepapers Typographic conventions Table 8 Document conventions Convention Element Blue text: Table 8 (page 36) Cross-reference links and e-mail addresses Blue, underlined text: http://www.hp.
HP Insight Remote Support software HP strongly recommends that you install HP Insight Remote Support software to complete the installation or upgrade of your product and to enable enhanced delivery of your HP Warranty, HP Care Pack Service or HP contractual support agreement.
11 Documentation feedback HP is committed to providing documentation that meets your needs. To help us improve the documentation, send any errors, suggestions, or comments to Documentation Feedback (docsfeedback@hp.com). Include the document title and spares part number, version number, or the URL when submitting your feedback.