HP StoreOnce 4900 Backup system Installation and Configuration Guide Abstract This document describes how to install and configure HP StoreOnce 4900 Backup systems. These systems are also sometimes referred to as single-node StoreOnce products and they run StoreOnce software version 3.10.0 or later.
© Copyright 2013–2014 Hewlett-Packard Development Company, L.P. Confidential computer software. Valid license from HP required for possession, use or copying. Consistent with FAR 12.211 and 12.212, Commercial Computer Software, Computer Software Documentation, and Technical Data for Commercial Items are licensed to the U.S. Government under vendor's standard commercial license. The information contained herein is subject to change without notice.
Contents 1 Checklists for completion prior to installation..................................................6 Product configuration................................................................................................................6 Location..................................................................................................................................6 Backup strategy................................................................................................................
6 Network configuration, understanding the StoreOnce networking concepts......38 Network configuration.............................................................................................................38 Configuration guidelines.....................................................................................................39 Portsets..................................................................................................................................
Driver installation (optional, VTL only)........................................................................................92 iSCSI Initiator (optional, VTL only).............................................................................................93 Manual iSCSI initiator installation........................................................................................93 The iSCSI Initiator and Authentication...................................................................................
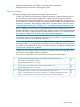
1 Checklists for completion prior to installation Use the following checklists to ensure that: • You know the location, power and networking/fibre channel requirements of the product at the time of placing the order. • You have prepared the environment and the information that you or the service specialist requires to install and configure your system.
• Adequate protection from dust, pollution, and particulate contamination • Adequate acoustic insulation for operating the system. Backup strategy The backup strategy impacts networking and Fibre Channel decisions. • To back up to StoreOnce Catalyst stores, Ethernet connectivity is required. Backup jobs use the same network paths to/from the appliance. Catalyst copy jobs always use Ethernet connectivity between StoreOnce appliances.
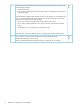
4. The following AD domain details will be required to configure AD. Have them ready to provide to the HP Support engineer. • The AD domain name ................................... • The user name and password of the Domain Administrator or a delegated user with Domain Administrative rights .......................................................................... Once the StoreOnce Backup system has been joined to an AD domain, you can configure users or groups on the StoreOnce Backup system.
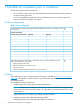
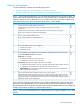
Network requirements To help complete this checklist read the following sections: • Network configuration, understanding the concepts (page 38) • Network configuration, how to use StoreOnce CLI commands (page 45) NOTE: During network configuration, you will define the portset to be used for each subnet. The portset defines which ethernet ports are used and any bonding mode to be applied. A separate portset is required for each subnet that is not on a VLAN (virtual LAN).
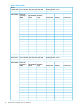
Table 2 Subnet details Portset number/name Ports used (eth0, eth1, eth2, eth3, eth4, eth5) Subnet details 10 Name and type (Phys or VLAN) Tag ID if VLAN IP address subnet range Bonding mode (1, 4 or 6) Subnet mask Gateway Portset name Ports used (eth0, eth1, eth2, eth3, eth4, eth5) Bonding mode (1, 4 or 6) Subnet details Name and type (Phys or VLAN) Subnet mask Tag ID if VLAN IP address subnet range Checklists for completion prior to installation Gateway Domain name Domain name
Table 2 Subnet details (continued) Portset number/name Ports used (eth0, eth1, eth2, eth3, eth4, eth5) Bonding mode (1, 4 or 6) Portset name Ports used (eth0, eth1, eth2, eth3, eth4, eth5) Bonding mode (1, 4 or 6) Subnet details Name and type (Phys or VLAN) Subnet mask Tag ID if VLAN IP address subnet range Gateway Portset name Ports used (eth0, eth1, eth2, eth3, eth4, eth5) Bonding mode (1, 4 or 6) Subnet details Name and type (Phys or VLAN) Subnet mask Tag ID if VLAN IP address subnet rang
Fibre Channel If you are using Fibre Channel for backup, please complete this section. 1. Have you defined how Fibre Channel should be configured for Virtual Tape Libraries (VTL) — the number of ports to be used, speed and topology of the SAN? • Number of ports to be used?.................. • Port speed? ................. • SAN topology?.................. NOTE: StoreOnce Catalyst over Fibre Channel uses the same settings. This feature is available with StoreOnce software version 3.11.
Miscellaneous If NTP, email and SNMP requirements are specified prior to installation, it will help you configure your system. 1. NTP is recommended for time synchronization, for example when replicating data. 1. Do you want NTP server connection?................................................................................ 2. What is the IP address of the NTP server(s)?....................................................................... (Up to two NTP servers are supported)...........................
4. Do you have the correct licenses for your installation? • An Instant-On license is available for StoreOnce Catalyst and Replication. This is valid for 90 days. NOTE: The Instant On license is not valid for capacity expansion nor the StoreOnce Security Pack, which always require a full license. • A full license is required for all storage that is additional to the base configuration and for StoreOnce Security Pack.
2 Before you start In this chapter: • Introduction (page 15) • HP StoreOnce 4900 Backup (page 16) • Software and hardware requirements (page 18) • Supported Ethernet configurations (page 18) • Supported Fibre Channel connections (page 19) • Web browser settings (page 20) • StoreOnce CD contents (page 20) Introduction The HP StoreOnce Backup system is a disk-based storage appliance for backing up network media servers or PCs to target devices on the appliance.
HP StoreOnce 4900 Backup Table 3 HP StoreOnce 4900 models Product model Description Interfaces supported HP StoreOnce 4900 48TB Backup, BB903A A head server unit iSCSI and FC with two 1TB disks and a pre-configured two-drawer disk enclosure with eleven 4TB disks and four hot spare disks BB908A 11–disk expansion kit BB904A One additional disk enclosure with 11+4 spare pre-configured storage Ports Storage expansion 4 x 1GbE ports 4 x 10GbE ports4 x FC ports 1.
Rear view of the HP StoreOnce 4900 Backup Figure 2 Rear view of the head server 1. RAID card 1 2. FC card 1 3. FC card 2 4. RAID card 2 5. 10GbE card 1 6. 10GbE card 2 7. Power supply 1 8. Power supply 2 9. USB ports 10. Video/monitor port 11. iLO4 Management port (do not use for data connection) 12. Serial connector 13. 1GbE network port 1 (used with Quick Install option) 14.
Figure 3 Rear view of the disk enclosure 1. Power supply 2. Drawer 2, IO module A 3. Drawer 2, IO module A, Port 1 4. Drawer 2, IO module A, Port 2 5. Power supply 6. Drawer 1, IO module A 7. Drawer 1, IO module A, Port 1 8. Drawer 1, IO module A, Port 2 9. Drawer 1, IO module B, Port 1 10. Drawer 1, IO module B, Port 2 11. Drawer 1, IO module B 12. Power supply 13. Drawer 2, IO module B, Port 1 14. Drawer 2, IO module B, Port 2 15. Drawer 2, IO module B 16.
• Networking parameters are contained within a network configuration. For ease of installation, a default configuration is initially applied to the StoreOnce Backup system. As long as LAN port 1 of the appliance is connected to a DHCP–enabled 1GbE network switch, the HP StoreOnce Backup system will be active on the network immediately after installation.
Software requirements • Backup and restore to Virtual Tape Library targets requires software that supports tape libraries. This software resides on a backup media server, not the HP StoreOnce Backup system. StoreOnce target devices may be used with major backup applications from HP, Symantec, EMC, Computer Associates and others.
3 Installing and cabling the HP StoreOnce 4900 Backup system Always refer to your rack documentation and to the Safety Guide and the Installation and Configuration Guide on the HP StoreOnce Backup CD for detailed instructions, including important safety information, about installing units within the rack. HP recommends locating the disk enclosure below the HP StoreOnce 4900 head server. If installing two disk enclosures, the recommendation is to install both disk enclosures below the head server.
The rack rails are marked for easy identification. The left rack rail is marked "L" and the right rack rail is marked "R." To install the rack rails: 1. Begin with the left rack rail. Align the end of the rail with the rear rack column. 2. Slide the rack rail closed until the end of the rail is locked in place, wrapping behind the rear rack column. 3. Slide the front end of the rail to the rack front column. When fully seated, the rack rail will lock into place. Figure 4 Installing the rails 4. 5.
Figure 5 Inserting the locking nuts 6. Install the 1U support shelf immediately below the location for the disk enclosure. Installing the disk enclosure Leave the base storage disks in the enclosure, but do not add any further expansion disks (if purchased) until the disk enclosure is fully installed.
1. Holding the handles (1), lift the disk enclosure onto the rack and push it into position (2). Tighten the thumbscrews (3) to secure the unit to the rack. WARNING! Always use at least two people to lift an enclosure into the rack. If the enclosure is being loaded into the rack above chest level, a third person must assist with aligning the enclosure with the rails while the other two people support the weight of the enclosure.
Installing the head server 1. 2. The label on the top of the HP StoreOnce Backup system contains important information, including the MAC address and default network name. The label also contains the iLO4 password for the system. Make a note of this information before you install the HP StoreOnce Backup system in the rack. See also Password best practices (page 34). Slide the HP StoreOnce Backup system into position in the rack and secure it to the rack rails using thumbscrews on the unit's front bezel.
2. 3. Connect the supplied 2m SAS cables from the head server unit to the first disk enclosure, as follows: • RAID card 1, port 2 to Drawer 2, I/O module B, port 2 • RAID card 1, port 1 to Drawer 1, I/O module A, port 1 Connect the supplied 0.5m SAS cables as follows: • Drawer 1, I/O module A, port 2 to Drawer 2, I/O module A, port 1 • Drawer 2, I/O module B, port 1 to Drawer 1, I/O module B, port 2 Figure 9 Cabling the first disk enclosure 4. 1.
Figure 10 Cabling the second disk enclosure 5. 1. 2m SAS cable RAID card 2, port 2 to Disk enclosure 2, Drawer 2, I/O Module B, Port 2 2. 2m SAS cable RAID card 2, port 1 to Disk enclosure 2, Drawer 1, I/O Module A, Port 1 3. 0.5m SAS cable Drawer 1, I/O module A, port 2 to Drawer 2, I/O module A, port 1 4. 0.
Installing disks from the 44TB Capacity Expansion kit Distributing the disk drives correctly The initial eleven disks (plus four hot-plug disks) in the disk enclosure are installed and pre-configured as follows when the HP StoreOnce 4900 Backup is installed. Table 4 Disk bays populated at installation Disk Enclosure 1 Initial storage configuration Drawer 1 Drawer 2 Two spare hot disks in bays 34 and 35 and eleven disks in slots 23-33. Two spare hot disks in bays 34 and 35.
Table 5 Populating disk bays with Capacity Expansion kits (continued) + Expansion kit 4 Add eleven disks to slots 1-11 Do not change + Expansion kit 5 Do not change Add eleven disks to slots 1-11 To install the drives WARNING! To reduce the risk of personal injury or damage to the equipment, extend only one hard drive drawer at a time.
Figure 14 Removing the disk blank 4. Press the button (1) to release the carrier handle (2). Insert the hard drive (3) and close the carrier handle (4). Figure 15 Installing the drive 5. Repeat steps 4 to 6 until all eleven disks have been installed. Close the hard drive drawer. You will hear it click into place when it is securely closed. The fans will return to normal speed when both drawers are properly closed.
6. Additional storage is not pre-configured or licensed at installation. See Expanding storage (page 65).
4 Powering on and managing the StoreOnce Management system In this chapter: • Powering on disk enclosures (page 32) • Powering on the HP StoreOnce Backup system (page 32) • Discovering the HP StoreOnce Backup system on the network (page 33) • Accessing the StoreOnce Management console (page 33) • User roles and accounts (page 34) • Password best practices (page 34) Powering on disk enclosures Verify all disk enclosures attached to the system are powered on (1) before powering on the head server
Discovering the HP StoreOnce Backup system on the network If you have used the Quick Install option of connecting LAN Port 1 to a DHCP-enabled 1GbE network, you can connect to and manage the StoreOnce Backup system from any client attached to the same network using the appliance's Fully Qualified Domain Name (FQDN). The FQDN is on a label/sticker on the server. Once connected, run the StoreOnce CLI network commands to optimize your network configuration.
1. Enter: https:// You may also use the Fully Qualified Domain Name (FQDN) NOTE: If you use http: in the URL, you are automatically forwarded to the https: secure network connection. 2. The StoreOnce Management Console displays the Login prompt. Provide a User Name and Password (Admin, admin). IMPORTANT: The web browser used to communicate with the HP StoreOnce Backup system requires Active Scripting or JavaScript enabled. Without these scripts enabled, some browser buttons may not display.
NOTE: Note that once the Admin account password has been changed, its password cannot be changed back to admin as this password is not sufficiently complex. The only way to revert that password back to admin is via the HPresetpassword account which is only available on the local console of the device. • As you create new users, use the StoreOnce CLI system save config command to save details of the new user accounts.
5 Configuration using the system set config wizard The StoreOnce CLI command set provides two configuration wizards: • The system set config command sequence packages a number of commands, some of which you may skip, if required. This wizard is recommend if you wish to configure time and license settings at the same time as network settings and run a health check. The network configuration element of this wizard uses the net set wizard command.
Configure Licenses The customer must provide license information if this step is to be executed. You may skip this step and the customer may configure licenses later, if the required License To Use (LTU), for example for replication, have not yet been obtained. See Configuring licenses (page 64), Verify Hardware health This step generates a file called HealthReport in the health folder of the StoreOnce folder structure, which you can copy after installation as a record of system health.
6 Network configuration, understanding the StoreOnce networking concepts If you are new to the StoreOnce networking environment, read this chapter. For examples of using the StoreOnce CLI commands to configure the network go to Network configuration, how to use StoreOnce CLI commands (page 45).
Figure 18 Network configuration hierarchy Configuration guidelines When working with network configurations the following guidelines apply: • There are two fixed configuration names reserved for the system that cannot be used: Factory_Default_Configuration and current. • There may be up to 16 configurations on any StoreOnce Backup system, but only one can be active. • Filenames are alpha numeric.
If you select a bonded configuration for your network, the network wizard provides a number of permutations for a portset, depending upon the availability and number of 10GbE ports. The example below is for an HP StoreOnce 4500 or 4700 Backup system, which has two 10GbE ports, and only one 10 Gig bonding option..
P1 P2 P3 P4 P5 P6 P7 P8 eth0 eth1 eth2 eth3 eth4 eth5 eth6 eth7 - 1 Gig 1 Gig 1 Gig 1 Gig 10 Gig 10 Gig 10 Gig 10 Gig Bonding Modes Supported 1: Active Passive Bonding 4: Link Aggregate Control Protocol (LACP) Bonding 6: Active Load Balance Bonding Command Successful Network bonding modes Each set of network ports on the appliance can be configured either on separate subnets or in a bond with each other (1GbE and 10GbE ports cannot be bonded together).
1. 2. 3. Define how many subnets you wish to support for backup to the StoreOnce Backup system, the speed at which you wish data to be transferred and whether you require ports to be bonded. This will determine how many physical port connections you require and whether the subnet should be configured to use 1GbE or 10GbE ports.
define 20 VLANs, each with its own subnet and, typically, use the 10GbE bonded link to the HP StoreOnce Backup system as a trunk. To do this, the network administrator sets up the switches with the necessary VLANs and identifies 20 tags. (The tag values can be any integer between range 2-4094.) The ports on the network switch to which the StoreOnce Backup system connects must be trunked and tagged.
Figure 19 Network example NOTE: For a worked example on configuring this network see Network configuration, how to use StoreOnce CLI commands (page 45).
7 Network configuration, how to use StoreOnce CLI commands If you are new to the StoreOnce networking environment, read the previous chapter first before attempting to configure the network..
6. • Gateway IP address • Domain name, such as mycompany.com The preceding information is sufficient to configure the network and once entered, the wizard will display and ask you to confirm the specified settings. At this point, do you wish to configure another subnet? For example, you may wish to dedicate one network to StoreOnce Catalyst Copy and replication. Or, you may wish to use the 10GbE network for backup data. You will be prompted to provide details of the new subnet, as above. 7.
Figure 20 Network configuration flowchart Before running net set wizard 47
Network configuration using net set wizard NOTE: See Example network environment for a diagram illustrating the network configuration that we are creating in this example. The net set wizard guides you through the network configuration on the StoreOnce Backup system and configures all network settings for all subnets. Before running the wizard collect and verify the required information, see Before running net set wizard (page 45).
Figure 21 Network configuration example NOTE: The wizard runs continuously. You cannot interrupt it and save the configurations already specified. However, for the purposes of this example, we have split it into sections to add notes. 1. First, we shall specify the DNS servers and create Portset1 on eth0. We shall keep this as DHCP in line with the Quick Install option.
Select the (Selecting 1 = Single 2 = Bonded type of configuration for this subnet "bonded" here will create a "portset" consisting of two separate NICs bonded together) : port (default) ports (note ports must be the same speed to bond) -->1 <--Bonded/Single: Single port Select network adapter : 1 = eth0 (1 Gig) (default) 2 = eth1 (1 Gig) 3 = eth2 (1 Gig) 4 = eth3 (1 Gig) 5 = eth4 (10 Gig) 6 = eth5 (10 Gig) -->1 <--Single Port: eth0 (1 Gig) --------------------------------------------------The next questio
1 = No (default) 2 = Yes - on a new physical port set 2. At this point, you have configured the network sufficiently to enable access to the StoreOnce Management CLI and GUI. If preferred, you could complete the network wizard and carry out the rest of the network configuration using the StoreOnce CLI commands. For the purposes of our example, we shall continue to create a second portset on the pair of 10GbE ports, eth4 and eth5, which will use bonding mode 4 and be VLAN-enabled.
Do you want to configure a static default gateway for this subnet or get the gateway information from DHCP? 1 = Gateway obtained from DHCP server (default) 2 = Set gateway manually (this may be blank if no gateway is required) -->2 <--Gateway: Set gateway manually (this may be blank if no gateway is required) ----------------------------------------------------Note that if you intend to select this network as the default network later on, then you must now specify an IP address.
<--Bonding: eth4, eth5 (10 Gig) Select the desired bonding mode : ----------------------------------------------------------------Note that if you select bonding mode 6, you will not subsequently be able to add VLAN networks to this portset.
Domain Name: uk.mycompany.net Gateway: 172.1.1.1 VLAN tag: Port Set: portset_3 with these interfaces: eth2 eth3 Encryption Links: Bonding Mode: 6 (Active Load Balance Bonding) Is this configuration correct? 1 = Yes (default) 2 = No -->1 <--Configuration okay: Yes ------------------------------------------------------------If you have added all subnets, then you may proceed: you will then be shown a summary of the configuration and be given the option to validate it, and then a further option to apply it.
Gateway: dhcp VLAN tag: Port Set: portset_1 with these interfaces: eth0 Encryption Links: Bonding Mode: Not applicable ---------------------Network: subnet_2 ---------------------IP Addresses: 10.1.1.16 Net Mask: 255.255.255.0 Domain Name: rnd.mycompany.net Gateway: 10.1.1.
TIP: If the network configuration is complex, it may take a little time for the settings to become active. After completing the wizard use the following StoreOnce command to check progress: net activate status Modifying the current network configuration NOTE: It is not possible to activate a new configuration if storage addition is in progress. After upgrade, depending upon the initial configuration, you may wish to: • Create a new portset to add a further subnet.
To add VLAN subnets VLAN subnets may only be added to portsets that are VLAN enabled. In our example, portSet2 is VLAN enabled. We shall add the new subnet, SalesSubnet with a VLAN tag ID of 23. This will not be the default gateway. 1. Copy the current config that has just been created and activated by the wizard to a new config name that can be edited: # net copy config from current to ACMECorpNetwork1 2.
ipaddr 10.2.1.55 gateway 10.2.1.1 netmask 255.255.0.0 domain sales.mycompany.net nl default no vlantag 23 Command Successful 4. Check the configuration again. # net show config ACMECorpNetwork1 ---------------------Network Name: ACMECorpNetwork1 Network Description: Created by wizard on: Wed Apr 30 15:26:40 2014 Write Protected: no DNS Servers: 172.1.1.100 172.1.2.
5. Validate the configuration: # net validate config ACMECorpNetwork1 Command Successful 6. Activate the configuration: # net activate config ACMECorpNetwork1 To add Data in Flight Encryption IP packets have no in-built security measures, which means that access to the network enables packet content to be viewed and, because there is no verification, there is no indication whether a packet has been viewed or the content modified.
Figure 22 IPsec pairs for Data in Flight Encryption License requirements If you wish to use the IPsec feature, you must first install the Security pack license. Configuring the StoreOnce Backup system The syntax for the StoreOnce CLI command is: net add encryption myconfig mysubnet ipAddr clientip passPhrase mypassword In the following example, we have created a copy of the configuration called config_with_ipsec that adds encryption to subnet_2.
---------------------Network: subnet_2 ---------------------IP Addresses: 10.1.1.21,10.1.1.22 Net Mask: 255.255.0.0 Domain Name: rnd.mycompany.net Gateway: 10.1.1.1 Default Network: Net Usage: data VLAN tag: 22 Port Set: portset_2 with these interfaces: eth5 eth7 Encryption Links: 172.18.198.101 Bonding Mode: 4 (Link Aggregate Control Protocol (LACP) Bonding) Encryption with replication StoreOnce Backup systems are treated exactly like clients by IPsec.
For example, we have one 1GbE port unassigned, eth1. To add it after initial configuration we would use the following procedure. NOTE: 1. We will not configure this subnet with the default gateway. Create a new portset for the copied configuration. The StoreOnce CLI command is in the format: net create portset ACMECorpNetwork1 portset_4 ports eth1 vlansupport no 2. Add a subnet to the portset.
8 Completing the installation This chapter describes common tasks required after installation. • Set the time and date and NTP server, if this was not done as part of the system set config wizard. See also Setting up time and date (page 63). • Apply any licenses for additional capacity, replication, StoreOnce Catalyst or Security features, if required. See Configuring licenses (page 64). • Discover and add storage for any Capacity Expansion that has been installed. See Expanding storage (page 65).
Configuring licenses The HP StoreOnce Backup system requires licensing for some features: • All capacity expansion must be licensed. The correct number of licenses for additional storage must be installed in the correct order. The 44TB Capacity Expansion Kit has a different license type from the 60TB Capacity Expansion Kit. The StoreOnce Backup system requires licenses to be installed in the following sequence: 5 x 44TB Capacity Expansion, 1 x 60TB Capacity Expansion, 5 x 44TB Capacity Expansion.
IMPORTANT: The StoreOnce 4900 Backup system requires licenses to be installed in the following sequence: 5 x 44TB Capacity Expansion, 1 x 60TB Capacity Expansion, 5 x 44TB Capacity Expansion. The 60TB Capacity Expansion is a second disk enclosure with basic disk capacity and cannot be added until the first disk enclosure has been filled to capacity, using five 44TB Capacity Expansion Kits. 1. Obtain the unique License to Use (LTU) key, as instructed on the License Entitlement Certificate.
NOTE: When expanding capacity, additional pools are created for each set of disks. As there is a separate Storage Cluster for each disk enclosure and associated RAID controller, the pools under Storage Cluster 1 are expanded first. This is the first disk enclosure that is attached to the RAID card in PCI slot 1 and the pools are identified from Pool (C1_P1) to Pool (C1_P6).
3. After LUNs are created, parity initialization starts. This can take up to 10 hours to complete. Log on to the StoreOnce User Interface to check the status of this process. Check the Pools and Volumes information for each storage cluster. There are up to 6 pools for each storage cluster. Expand the Hardware tree to find the pool that is appropriate for this capacity expansion. To check the progress of parity initialization, expand each degraded pool to check the status of the Volumes.
# # system show status Storage Set —----—----–—--Set Status ----–– Formatted 34,876.99GB, Adding 37,134.57GB... Service Sets Status Notes ------------ ------ ----Set 1 Running # 7. Once the storage is available performance will not return to normal until parity initialization has completed.
Use the appropriate commands to perform the required tasks. Software update process 1. 2. Identify the version of software currently installed on the system from the StoreOnce page of the GUI or by using the StoreOnce CLI command, system show packages. Locate the latest software on the HP Support pages — go to http://www.hp.com/support and search for your product. If you need to upgrade, download the software, delivered as a single RPM file.
for this command, either the node or the storage. The command will be applied across all server components or across all storage components. Configuring Remote Support Remote Support, available with StoreOnce software version 3.11.0 and later, enables the StoreOnce appliance to pro-actively "call back" to HP when issues arise on the system, if configured to do so.
Table 7 Warranty details for HP StoreOnce models Product Product Number(s) Serial Number(s) Notes HP StoreOnce 4900 Is different to the part number on the server Is different to the serial number on the server The base product is a bundled product which consists of a head server unit and a storage enclosure. One further storage enclosure may be added.
3. 72 Select Customer Information. Click Modify and enter technical contact details for the customer site. HP Support will use this information to provide feedback and instructions on resolving any issues. Information is required for all fields marked with an asterisk.
4. Select Server. Click Modify and enter the warranty details for the server. You must provide the serial number and product number in the Customer Entered fields. You will find this information on the toe tag attached to the server; see also Remote Support and warranty details (page 70).
5. 6. 74 Select Storage. If you cannot see all storage enclosures, click Rescan devices. Select a storage device, click Modify and enter the warranty details for that storage device. You must provide the serial number and product number. See also Remote Support and warranty details (page 70).
7. Select Status to confirm that everything has been configured. There should not be an X against any field on the screen. NOTE: 8. A missing serial number will prevent a test event being sent. Click Send Test Event on the Remote Support page.
9. Call up HP support and ask to verify a remote support event has been received. The HP Support person will check on the database portal that the event has been received and will also verify that warranty/serial/part numbers are valid and under warranty (or have valid care packs). This completes Remote Support verification.
Configuring SNMP This feature enables an HP StoreOnce Backup system to act as a Network Element in an SNMP network so that it can communicate effectively with Network Management Stations using SNMP (Simple Network Management Protocol). You use the StoreOnce CLI to enable this feature and configure various settings, as described below. The StoreOnce implementation of SNMP is compatible with and has been tested with HP System Insight Manager (HP-SIM).
Restoring the configurations The configuration consists of two parts: 1. A set of instructions in the form of a text file, devconfig.txt, for the user to manually restore some of the network and device management configuration settings that cannot be automatically restored. 2. A zip file, devconfig.
4. Once logged in a list of available commands will be presented. reset: Reset the 'Admin' password to 'admin'manage: Change the 'HPresetpassword' user's passwordhelp: List available commandsexit: Log out 5. 6. 7. Run the command manage to change the password for the HPresetpassword user.
9 Fibre Channel installation and configuration Backup and restore is supported over both Ethernet networks and Fibre Channel SAN. However, the StoreOnce Management Console and many of the other StoreOnce features, such as replication, always require an Ethernet connection. When using FC to back up hosts, you should still connect to an Ethernet port. NOTE: The HP Brocade SAN Switches support NPIV natively but the Cisco SAN Switches require that it be turned on each port used.
Port assignment for StoreOnce Backup systems There are two FC cards and, therefore, four FC ports. When creating a library you may select individual drives or FC ports 1&2 or FC ports 3&4. Be aware that Port 1 and port 3 are on the first FC card; port 2 and port 4 are on the second FC card, so it is important to verify that the system is cabled correctly when connecting to the FC SAN. If you select one of the combined port options, both FC cards must be connected.
from discovering unnecessary disk controllers. For optimal performance, where practical, dedicate HBAs for disk and tape. NOTE: Overlapping zones are supported. Use the StoreOnce Management GUI to find out the WWPN for use in zoning. The WW port names are on the VTL-Libraries-Interface Information tab. Diagnostic Fibre Channel Device For each FC port there will be a Diagnostic Fibre Channel Device presented to the Fabric. There will be one per active FC physical port.
10 Configuring backup servers to work with HP StoreOnce This chapter describes how to configure Tape drivers and iSCSI on Windows backup servers. If working in a Linux or UNIX environment, refer to the separate HP StoreOnce Backup systems Linux and UNIX Configuration guide.
2. In the left hand navigation tree right click on Windows Firewall with Advanced Security and select Properties. 3. To make sure the firewall is switched on for the profile on which your network interface is running go to the IPSec Settings tab.
4. 5. Under IPsec defaults click Customize. Under Key exchange (Main Mode), select Advanced and click Customize. 6. Under Key Lifetimes, set Minutes to 480.
7. Under Data Protection (Quick Mode), select Advanced. 8. Click Customize. Under Data Integrity algorithms and Data Integrity and Encryption Algorithms, select a protocol and click Edit.
9. Under Key lifetimes set the value of KB to 100,000,000 and click OK. 10. Click OK three times to close the Properties boxes and return to the main Windows Firewall with Advanced Security window. 11. In the left hand navigation tree first click and then right click on Connection Security Tools. 12. Select "New Rule.
13. For Rule Type select Server-to-server. 14. Click Next to move to Endpoints. 15. Under Which computers are in Endpoint 1, select These IP addresses and click Add.
16. Enter the IP address of the interface on the local machine (i.e. the Windows Server). An IP range can also be entered if you have one. 17. Under Which computers are in Endpoint 2, select These IP addresses and click Add. 18. Enter the IP address of the remote machine, which is the HP StoreOnce Backup system. Multiple IP addresses on the HP StoreOnce Backup system can be configured here to connect to the IP address specified for the media server. Click Next.
19. Select Require authentication for inbound and outbound connections. 20. Click Next to move to the Authentication Method step. 21. Select Advanced and click Customize. 22. In the Customize Advanced Authentication Methods window, click Add in the left hand side under Fist authentication methods.
23. Select Preshared key. 24. Enter the same key that you provided when configuring the StoreOnce Backup system using the StoreOnce CLI command, net add encryption (see To add Data in Flight Encryption (page 59)). Click OK. 25. Click OK and click Next. 26. Select the network type to which this connection rule applies and click Next. 27. Provide a name for the connection and click Finish. 28. To view the status of the created connection rule, expand Monitoring>Security Associations.
Driver installation (optional, VTL only) To create Virtual Tape Devices on the HP StoreOnce Backup system, two drivers are required—an HP LTO Tape driver and a medium changer driver. NOTE: Certain backup applications require their own drivers for both the tape device and medium changer. For many applications these are installed automatically during the software installation process.
NOTE: For a Fibre Channel Backup system, a new “unknown” device will be discovered in Device Manager. This device is required only to ensure that a Fibre Channel target exists as LUN 0 in the SAN. No functionality is provided by this device and no driver is required. iSCSI Initiator (optional, VTL only) This section is not relevant if you are configuring only FC library devices, Catalyst stores or NAS shares on your HP StoreOnce Backup system.
The 1. 2. 3. recommended process if you wish to enable authentication is: Create the devices on the StoreOnce GUI or CLI. Set up the Targets in the iSCSI Initiator. Connect to the devices using the CHAP user name and secret that you configured on the Targets tab. The Microsoft iSCSI Initiator The Microsoft iSCSI initiator contains a number of tabs. This section describes the information that must be provided in order to connect the host to a device on the HP StoreOnce Backup system.
3. Click Discover Portal... You must enter the IP address or fully qualified domain name of the HP StoreOnce Backup system (for example, mystoreonce.mydomain.com) to add it as a target portal for the host on the Discovery tab. Do not change the Port; it should be 3260. 4. Click on OK to add the target portal to the Discovery page. You may need to click Refresh.
5. 96 When you run the iSCSI Initiator manually, new devices have a status of Inactive on the Targets tab. You must log on to the appropriate targets for your host. Remember that each library has at least two devices and you must log onto each one separately. If the emulation type you have selected allows more drives, there will be a target device for each drive.
6. Select the first target in the list and click on Connect. We recommend that you enable the first checkbox to make the connection a Favorite target, so that you do not have to manually connect to it in the future. NOTE: If you wish to use CHAP authentication, click Advanced... before you click OK. See separate section below for more details about CHAP authentication. 7. 8. Repeat until all required targets have been added. Click OK. The targets are now showing as Connected.
Configuring backup servers to work with HP StoreOnce
9. Look at the Configuration tab. When you use the StoreOnce GUI or CLI to create library devices, you must provide the iSCSI Initiator Name, which you will find on this tab. (You also use this tab to set up the CHAP secret if you have enabled mutual authentication.) CHAP Authentication 1. If you wish to use CHAP authentication , click Advanced... on the Connect to Target dialog. (IPSec Tunnel Mode is not supported.) 2. Check Enable CHAP logon and enter the secret in the Target Secret box.
3. If you want to use mutual authentication, which means that the target must also log on to the Initiator, make sure that the Perform mutual authentication box is checked. The secret for mutual authentication is set on the Configuration tab. You must also provide the Target User Name and Secret when you configure the device in the StoreOnce Management Console. Favorite Targets tab The Favorite Targets tab shows the targets that have been configured to restore automatically on reboot.
iSCSI Initiator (optional, VTL only) 101
11 Understanding LEDs If an LED indicates an error condition, HP recommends reviewing the StoreOnce Event log for more information. For hardware-related errors the Hardware page of the StoreOnce GUI provides valuable information.
Front view of the HP StoreOnce 4900 Backup system The HP StoreOnce 4900 Series Backup system consists of a head server unit (with two disks) and one disk enclosure with 15 disks on which storage has already been expanded. It supports additional disks in the first disk enclosure (44TB Expansion Kits) and connection of an additional disk enclosure (60TB Capacity Expansion Kit). Storage must be expanded when expansion kits are added to the base configuration.
Front view of the disk enclosure Figure 25 Disk enclosure LEDs 1. Hard drive LEDs Normal mode (UID LED is solid) Green = The drive is online, but is not currently active. Flashing irregularly green = The drive is active and it is operating normally. Flashing green (1 Hz) = Do not remove the drive. Removing the drive may terminate the current operation and cause data loss.
Off = UID LED is disabled 3. Internal health LED Green = System health is good Off = System is off 4. GSI LED Amber = Enclosure requires service check: I/O, fan and power supply LEDs, and AC power cables to power supplies. Off = Enclosure is functioning normally.
Item Description Status • Power supply failed • Power supply exceeded current limit 6 System fan LED Green = Normal operation Amber flashing = Fault Off = Fan unseated from connector or 7 I/O module LED Green = System activity Amber = Fault Off = Enclosure is powered off.
Hot-plug drive LEDs Server units The hot-plug drives in head server units are illustrated below. The disks in the expansion shelves have a different carrier. Figure 27 Drive LEDs (head server unit) 1. Locate Solid blue = The drive is being identified by a host application. Flashing blue = The drive carrier firmware is being updated or requires an update. 2. Activity ring Off = No drive activity Rotating green = Drive activity 3. Do not remove Solid white = Do not remove the drive.
Figure 28 Drive in enclosure LEDs 1 Fault/UID LED (amber/blue) 2 Online LED (green) Table 8 Hard disk LED sequences Online Activity LED (green) Fault/UID LED (amber/blue) Interpretation On, off or flashing Alternating amber and blue The drive has failed, or a predictive failure alert has been received for this drive; it also has been selected by a management application. On, off or flashing Steady blue The drive is operating normally, and it has been selected by a management application.
Table 8 Hard disk LED sequences (continued) Online Activity LED (green) Fault/UID LED (amber/blue) Interpretation Flashing irregularly Amber flashing regularly (1 Hz) The drive is active, but a predictive failure alert has been received for this drive. Replace the drive as soon as possible. Flashing irregularly Off The drive is active and it is operating normally. Off Off A critical fault condition has been identified for this drive and the controller has placed it offline.
Figure 30 10GbE card LEDs 1. Link Off: No link to the adapter is established. The adapter is not receiving power or the cable connection is faulty On (yellow): Link to the adapter is established. The adapter is receiving power and the cable connection is good. 2. Activity Flashing green: Ongoing network data activity. The adapter is sending or receiving network data at up to 10 Gb/s Off: No network data activity or no connection.
Fibre Channel card LEDs There are three LEDs adjacent to each FC port. Table 9 FC card LEDs Yellow LED Green LED Amber LED Activity Off Off Off Power Off (OK) On On On Power on before or after software initialization. Awaiting HBA software initialization. Flashing Flashing Flashing Power on after software initialization. Link not initialized.
12 Troubleshooting Use the information in this chapter to troubleshoot problems. More detailed troubleshooting information will be made available at http://www.hp.com/support.
Connecting to the StoreOnce Backup system from the backup application Make sure you have the latest version or software patches for the backup application. Please see http://www.hp.com/go/ebs for supported applications. Stop and restart the backup application services after the backup device has been discovered. If you still cannot access the device, check Device Manager to make sure it is accessible from the host.
Powering off Use the StoreOnce CLI command: system shutdown.This gracefully shuts down the appliance by shutting down all services before powering down the server. This means when you power back up, the deduplication stores will start up from a clean state. The server will be in the off state, and will require powering on via the power button or StoreOnce CLI. Rebooting the system Use the StoreOnce CLI command: system reboot.
Capacity expansion When expanding capacity, it is very important not only to install the expansion kits in the correct sequence, but also to install the licenses for the expansion kits in the correct sequence. The HP StoreOnce 4900 Backup system requires: • The first disk enclosure to be expanded first. Up to 5 x 44TB disk expansion kits may be added, but be certain to install the disks in the correct bays as instructed on the disk enclosure labels, and apply the correct licenses for these kits.
Reboot the host Linux system and the connection will work again.
About this guide This guide provides information about: • Installing the HP StoreOnce Backup system • Using the HP StoreOnce Backup system • Troubleshooting the HP StoreOnce Backup system Intended audience This guide is intended for users who install, operate and maintain the HP StoreOnce Backup system.
Table 10 Document conventions (continued) Convention Element Monospace text • File and directory names • system output • Code • Commands, their arguments, and argument values Monospace, italic text • Code variables • Command variables Monospace, bold text WARNING! CAUTION: IMPORTANT: NOTE: Emphasized monospace text Indicates that failure to follow directions could result in bodily harm or death. Indicates that failure to follow directions could result in damage to equipment or data.
Subscription service HP recommends that you register your product at the Subscriber's Choice for Business website: http://www.hp.com/go/e-updates After registering, you will receive e-mail notification of product enhancements, new driver versions, software updates, and other product resources. HP websites For additional information, see the following HP websites: • http://www.hp.com • http://www.hp.com/go/ebs • http://www.hp.com/go/spock • http://www.hp.com/go/storeonce • http://www.hp.
A Regulatory information For important safety, environmental, and regulatory information, see Safety and Compliance Information for Server, Storage, Power, Networking, and Rack Products, available at http:// www.hp.com/support/Safety-Compliance-EnterpriseProducts. Belarus Kazakhstan Russia marking Manufacturer and Local Representative Information Manufacturer’s information: • Hewlett-Packard Company, 3000 Hanover Street, Palo Alto, California 94304, U.S.
HP Enterprise Servers http://www.hp.com/support/EnterpriseServers-Warranties HP Storage Products http://www.hp.com/support/Storage-Warranties HP Networking Products http://www.hp.
Index Symbols 1GbE LAN ports LEDs, 109 A audience, 117 authentication, 93 iSCSI initiator, 99 B Belarus Kazakhstan Russia EAC marking, 120 bonding modes, 41 C CD-ROM contents, 20 changer driver, 92 CHAP secret, 93 iSCSI initiator, 99 CLI running commands, 33 configuration, 77 connecting to FC SAN, 80 connecting from backup system troubleshoot, 113 conventions document, 117 text symbols, 118 customer self repair, 118 D data in flight encryption description of, 59 in network configuration, 60 demo license
licenses security pack, 60 licensing, 64 Linux iSCSI initiator, 93 M MIBs, 77 N net set wizard, 48 network example environment, 43 troubleshooting, 112, 113 network bonds, 41 network configuration add IP addresses, 61 add subnets, 61 add VLAN subnets, 57 data in flight encryption, 60 description of, 38 hierarachy, 38 modifying, 56 network ports number available, 40 nfs share cannot connect, 115 O other sources of information, 15 P passwords best practices, 34 performance troubleshoot, 113 physical ports
websites customer self repair, 118 HP , 119 HP Subscriber's Choice for Business, 118 product manuals, 117 Windows iSCSI initiator, 93 Z zoning, 81 124 Index