
9.5 HP P4000 VSA Installation and Configuration Guide


1. Begin the installer one of the following ways:
• Insert the HP P4000 Management Software DVD in the DVD drive.
• Double-click the executable that you downloaded to start the installation.
2. Click Install VSA for VMware ESX Server to begin the wizard.
3. In the Meta Launcher command line window that opens, enter 1 to run the installer CLI, or
enter 2 to run the installer GUI. Both versions require the same information and perform the
same installation.
• If you selected the GUI installation in the Meta Launcher CLI window, the GUI installer
window opens again and you click Install VSA for VMware ESX Server again to begin
the wizard.
4. If necessary, enter the login credentials to allow the installer to configure the VSA on the ESX
server, and click Yes.
5. Accept the terms of the License Agreement again.
6. Work through the wizard to configure the parameters of the virtual machine on the network,
including the hard drives. See Table 2 (page 7).
NOTE: Run the wizard again to configure another VSA using the same parameters as
appropriate.
7. Finish the installation, reviewing the configuration summary, and click Deploy.
When the installer is finished, the VSA is ready to be used in the HP P4000 SAN Solution.
8. Next, use the Find function in the CMC to discover the VSA, and then add it to a management
group.
Installing the VSA OVF version
Import the VSA OVF version as a virtual appliance through the Virtual Infrastructure Client. When
you import the VSA you must perform the following tasks:
• Configure the data disk(s).
• Power on the VSA and set the IP address and host name of the VSA.
Configuring a data disk
When you configure the data disk, use Table 3 (page 8) to determine the proper size for the
disk. The maximum disk size on the ESX Server is limited by the block size used to format the
datastore.
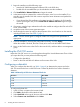
Table 3 Relationship of disk size to datastore block size
Max VMDKBlock Size
256 GB1 MB
512 GB2 MB
1024 GB4 MB
2048 GB8 MB
To configure the data disk:
1. In the VI Client, navigate to the Inventory Panel.
2. Click Add at the bottom of the Hardware tab.
3. Select Hard Disk as the type of device to add and click Next.
4. Select Create a new virtual disk and click Next.
8 Installing the VSA for ESX Server