
Adding and Configuring Components


Step 1.
Step 2. Release the locking levers located at the top and bottom of the cell board.
Step 3. Remove the cell board and place it on a flat surface.
Step 4.
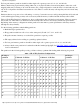
Employing the proper ESD procedures, carefully remove or install DIMMs as necessary. For more
details on memory configuration see Overview: Memory. For detailed instructions on how to remove
and replace DIMMs see Replacing a DIMM.
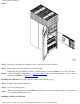
Installing the Cell Board For each cell board complete the following steps:
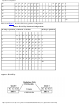
Step 1. Position and install the cell board.
Step 2. Secure the locking levers.
Step 3.
When all cell boards that needed DIMM redistribution have been completed apply +48 Volt power to
target partition/cabinet; boot O/S.
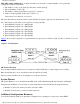
Installing An Add-on Cell Board
Installing Additional Cell Boards
http://superdome-test.fc.hp.com/sd_web/content/00/0A/DV/idd/401.html (4 of 6) [03/01/2001 2:09:45 PM]