
Adding and Configuring Components


Preliminary Procedures
This procedure must be completed prior to adding a DIMM.
Step 1.
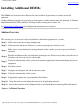
Verify the cabinet number using the front and rear panel displays. The displays show a numeric
cabinet value and are located on the Superdome front and rear door assemblies.
Step 2. Prepare a electrostatic discharge (ESD) safe work surface and make proper ESD connections.
Step 3. Visually inspect the replacement part(s) for proper part number and revision.
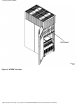
Step 4. Open the front cabinet door. The latch is located on the right side of the front door.
Step 5. Remove the applicable cell board to gain access to the DIMMs.
Installing Additional DIMMs
This section contains information on installing a DIMM.
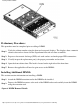
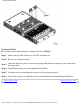
Step 1. Attach the DIMM extraction tool to the DIMM to be installed.
Step 2.
Depress the DIMM extractors at the ends of the DIMM socket and carefully insert the DIMM
using the extraction tool.
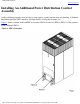
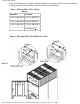
Figure 3 DIMM Removal Details
Installing Additional DIMMs
http://superdome-test.fc.hp.com/sd_web/content/00/0A/DT/idd/404.html (3 of 4) [03/01/2001 2:10:25 PM]