
Adding and Configuring Components


Step 1.
Apply +48 V. power to the target cabinet; boot the target cell/partition to the Boot Console
Handler (BCH) prompt.
Step 2. Run dc scan tests for the newly installed REO Link cables. [refer to nugget]
Step 3. Resolve any dc scan test faults. [refer to nugget]
Step 4.
Boot the target cell/partition to the Initial System Loader (ISL) prompt; load the Offline
Diagnostics Environment (ODE); load and run REODIAG; then run CIODIAG, if a core I/O
card is installed in PCI slot 0.
Step 5. Go directly to: "Installation Task Verification."
Installation Task Verification
This section contains information on verifying the installation of any PCI host adapters in the newly
installed PCI chassis:
Step 1. Run Support Tools Manager (STM) online tests for PCI cards, if any. [refer to nugget]
Step 2. Resolve any diagnostic faults. [refer to nugget]
Step 3.
Label defective REO link cable(s), PCI chassis, or PCI cards with proper information, and
package them for return to your local parts hub.
Step 4. Update the system logbook (Gold book), if applicable.
Step 5. Clean the work are, including the removal of all packaging material.
Step 6.
Advise the customer that the repair is completed, and thank them for choosing Hewlett
Packard.
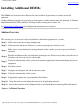
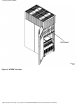
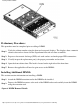
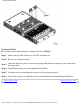
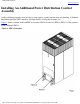
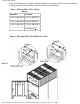
Installing Additional DIMMs Adding additional PDCAs
Installing a PCI Chassis - Offline
http://superdome-test.fc.hp.com/sd_web/content/00/00/H4/idd/405.html (2 of 2) [03/01/2001 2:10:33 PM]