
Adding and Configuring Components


Installing and Verifying an Additional PDCA
Plan the installation of the add-on before reaching the site. Know exactly what you will have to
do before you arrive on site if at all possible.
Use the following procedure to install and verify the PDCA:
Step 1.
Select or make sure that the proper PDCA has been selected. See PDCA Selection Criteria.
Step 2.
If the PDCA is to be hardwired, give the unit to the customer to allow an electrician, using
local electrical codes, to wire it.
Step 3. Check and record the existing configuration.
Step 4. Verify the functionality of the system before introducing the add-on equipment.
Step 5. Prepare a electrostatic discharge (ESD) safe work surface and make proper ESD connections.
Step 6. Make sure the circuit breaker on the PDCA is
OFF.
Step 7.
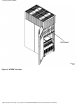
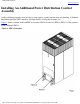
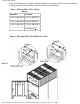
Insert the PDCA into the PDCA enclosure on the rear-right side of the SPU cabinet.
Figure 2 Installing the Additional PDCA
Adding additional PDCAs
http://superdome-test.fc.hp.com/sd_web/content/00/0C/0P/idd/406.html (2 of 22) [03/01/2001 2:11:03 PM]