
Adding and Configuring Components

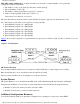


Upgrades and Add-ons
Installing Additional Cell Boards
Adding additional capacity to an existing system requires careful consideration and planning. A Solution
Implementation Plan (SIP) should be developed before visiting the customer site.
See SuperDome configuration for configuration information and resources.
Add-on Overview
This section gives an overview of the installation of additional equipment to a system:
Step 1. Check and record the existing configuration.
Step 2. Understand any hardware, firmware, or software prerequisites that may exist.
Step 3. Make sure a system backup has been performed and/or a make_recovery tape created by the customer.
Step 4.
Plan the installation of the add-on before reaching the site. Know exactly what you will have to do
before you arrive on site if at all possible.
Step 5.
Verify the functionality of the system and customer applications before introducing the add-on
equipment.
Step 6.
Install the add-on.
Adding a cell board may require the removal of existing cell boards for DIMM redistribution.
See Installing Add-on Cell Boards Requiring DIMM Redistribution for details.
Step 7. Configure and integrate the add-on into the system.
Step 8. Verify the functionality of the system.
Step 9. If applicable, update the system logbook (Gold book).
Step 10. Clean the work area including the removal of all packaging material.
Step 11. Advise the customer of the completed add-on and thank them for choosing Hewlett-Packard.
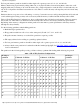
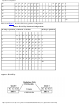
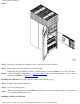
Figure 1 Cell Board Location
Installing Additional Cell Boards
http://superdome-test.fc.hp.com/sd_web/content/00/0A/DV/idd/401.html (1 of 6) [03/01/2001 2:09:45 PM]