
Superdome Servers - I/O Expansion Cabinet Guide, Fifth Edition


Chapter 5
Adding an ICE to the IOX
Connecting the Cables
111
Connecting the XUC-to-ICE Clock Cable
Connecting the Clock Cable to the XUC
If there are only two ICEs in the IOX after the upgrade (that is, there was only one before the upgrade), this
section may be skipped, because one clock cable supplies clocks to the first two ICEs (0 and 1).
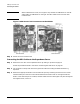
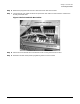
Step 1. Remove the front bezel from the XUC by grasping the indentions on both sides of the bezel and
pulling toward you.
Step 2. Remove the two XUC module retaining screws: one on each side of the XUC.
Figure 5-17Removing XUC Retaining Screws
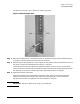
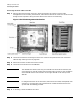
Step 3. Pull out the XUC from the IOX by pushing down on the front display and pulling it out until the
slides lock.
Figure 5-18XUC Extended
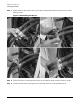
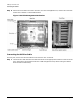
Step 4. Remove the XUC side panel by loosening the six captive T10 Torx screws.