
Superdome Servers - I/O Expansion Cabinet Guide, Fifth Edition


Chapter 6
Remove and Replace Procedures
Removing and Replacing the ICE Fan Module
148
Removing and Replacing the ICE Fan Module
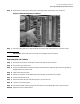
Four (N+1) I/O fans mounted in the rear of the ICE provide cooling for the chassis. Air is pulled through the
front as well as the I/O chassis lid (on the side of the ICE) and exhausted out the rear. The I/O fan assembly is
hot-swappable. An LED on each I/O fan assembly indicates that the fan is operating.
Required Tools
The following is a list of tools required for ICE assembly and service operations:
• Anti-static mat with provisions for connecting to chassis ground
• Wrist strap
• T10 and T20 Torx bit
• Torx driver
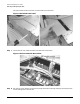
Removing the ICE Fan
To remove the ICE fan, perform the following steps:
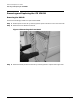
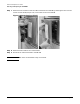
Step 1. Remove the front cosmetic bezel.
Step 2. Remove the front EMI panel by loosening the four T20 Torx screws.
Step 3. Retract the ICE tray retaining pins.
Step 4. Extend the ICE tray. With the tray extended, the fan modules are now accessible.
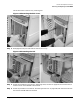
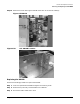
Step 5. Locate the fan to be removed.
Step 6. Loosen the four captive retaining screw.