
Superdome Servers - I/O Expansion Cabinet Guide, Fifth Edition


Chapter 6
Remove and Replace Procedures
Removing and Replacing the XUC
158
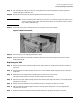
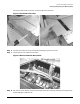
Step 8. Install all remaining cables on the back of the XUC.
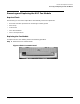
Step 9. Re-attach the XUC side panel by tightening the six T10 Torx screws
Step 10. Press the slide locks to release the slides and push the XUC into the rack.
Step 11. Re-attach the cosmetic bezel to the XUC.
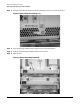
Step 12. Enable power to the XUC by connecting the DC power cable on the rear of the XPC.