
Superdome Servers - I/O Expansion Cabinet Guide, Fifth Edition


Chapter 6
Remove and Replace Procedures
Removing and Replacing the XUC Fan Module
161
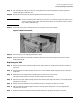
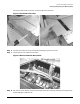
Step 6. Loosen the captive screw on the fan module.
Step 7. Remove fan module.
Figure 6-36 XUC Fan Replacement
Replacing the XUC Fan Module
Step 1. Connect your ESD wrist strap to the ESD grounding lug of the XUC.
Step 2. Install replacement fan module.
Step 3. Fasten the captive screw on the fan module.
Step 4. Close the door until the magnetic latch engages.
Step 5. Lower the CPA until is latches.
Step 6. Turn the two black slotted screws one-quarter turn clockwise.
Step 7. Reinstall the cosmetic bezel.